Wednesday, December 30, 2015

Tiramisu

Tiramisu is one of our most favorite desserts to buy for any occasion.  If there is a birthday or anniversary celebration, invariably we will have a store-bought tiramisu for dessert

Tiramisu is a coffee flavored Italian dessert, and looks and tastes like it takes hours to make.  The original recipe calls for raw eggs, heavy whipping cream, and mascarpone cheese.  Once I read the recipe, I was wary, because after reading about all the salmonella poisoning, I really did not want my family eating raw eggs.  


So I decided to explore further and find a recipe that does not use raw eggs.  There are several short-cut recipes available online.  I have made several versions – some using mascarpone cheese and heavy whipping cream, others using cream cheese and whipping cream, and my latest version, using cream cheese and store-bought whipped topping.  I used to make it with mascarpone cheese till last year, when my grocery stores ran out of it! Apparently tons of people were making tiramisu!  I have since switched to cream cheese and it works just as well.

This version hardly took any time at all and tasted great!  This recipe is mostly based on the one I found on Kraft Recipes (original recipe here).


Here is what you need:


  • 2 Tbsp. instant coffee
  • 1 Tbsp. sugar
  • 1 cup hot water
  • 16 oz. cream cheese, softened
  • 2 cups whipped topping, thawed
  • ½ cup sugar
  • 2 Tbsp. orange liqueur
  • 2 pkgs. ladyfingers (3 oz. each)
  • unsweetened cocoa for dusting
  • chocolate shavings


Here is how I made it:


  1. Mix the coffee powder and sugar.  Pour in hot water to make a strong cup of coffee.  Set aside.  You may use espresso or other strong coffee instead.  I normally brew a really strong cup, but my coffee maker was not cooperating this morning.
  2. Beat cream cheese with an electric mixer, on medium speed, till smooth.  Add sugar and mix well.  Add orange liqueur.  You may use Kahlua or other coffee flavored liqueur if you like.  I like the hint of orange in the tiramisu.  Gently mix in the whipped topping.  Set aside.
  3. The ladyfingers come in 3 oz. packages and are sliced.  Remove the top half and set aside.  Arrange the bottom half (from both packages) in a 9 X 13 serving dish.
  4. Brush coffee gently onto the ladyfingers so that they are soaked through.  I used about ¼ cup for this layer.
  5. Using a spatula spread half of the cream cheese mixture on top of the ladyfingers.
  6. Layer the remaining ladyfingers on top of this.  Brush with coffee (I used another ¼ cup for this layer)
  7. Spread the remaining cream cheese mixture and smooth it out. 
  8. Put cocoa powder in a tea strainer and tap gently over the tiramisu to give it an even dusting.
  9. Take a bar of chocolate and using a peeler, shave some chocolate curls for garnish.
  10. Cover and refrigerate for at least 6 hours.


Thanks Ram, for the picture!

Note:  This dessert can be made almost fat-free if you use fat free cream cheese and fat free whipped topping.  I used regular versions of both.   
I ended up using only ½ cup of coffee.  For stronger coffee flavor, you may want to use all of it.


Wednesday, December 23, 2015

Tabbouleah

Here is another super healthy salad I made for our Mediterranean party.  Tabbouleah is made with bulgar wheat and does not require any cooking.

I served it as a part of a meal.  It was one of many sides for my Mediterranean party.  Full menu here.


This recipe was on the side of the bulgar packet. I followed the recipe almost exactly.  I added more pepper than the original recipe. 


Here is what you need:


  • 1 cup bulgar wheat
  • 1 cup hot water
  • 2 roma tomatoes, seeded and diced
  • 1 english cucumber diced
  • 1 cup parsley, chopped
  • 5 -6 mint leaves, chopped
  • salt to taste
  • 1 tsp. cumin powder
  • 1- 2  tsp. black pepper
  • juice of 1 lemon
  • 2 - 3 Tbsp. olive oil


Here is how I made it:

  1. Mix bulgar and boiling water and soak for 1 hour.  I put it in a tupperware container and covered it. 
  2. Drain and squeeze out the water. 
  3. Mix all the other ingredients and let sit for an hour.
You can make this and store it for a few days in the fridge.  Makes a great addition to a Mediterranean menu or a healthy lunch idea!


Tuesday, December 22, 2015

Microwave Kalakand

I just never liked sweets.  I know people who cannot resist having one, or two, or more servings of dessert, but I am the kind of person, that if someone forces me to have dessert, then I have to have something spicy to get the taste of the sweet out – weird right?

But then, I am weird.


My husband, on the other hand, loves sweets.  He grew up eating Bengali sweets and I feel sad for him because I don’t make enough desserts at home.

So this year for deepavali, I made this super easy, and healthy (because there is no ghee) kalakand.  It has 3 ingredients – 4 if you count the nuts, and takes less than 15 minutes to make.  I found the recipe online.  It is on several blogs – so I don’t know who to give credit for this, but it is a fool proof recipe and if you have the ingredients on hand, a quick dessert


Here is what you need:

  • 15 oz. ricotta cheese
  • 1 can condensed milk
  • ¼ tsp. powdered elaichi (cardamom)
  • few chopped pistachios or almonds for garnish


Here is how I made it:


  1. In a microwave safe bowl, mix the condensed milk and ricotta cheese.  I add a little less than one can of condensed milk, because I don’t like it to be too sweet.
  2. Set the microwave to cook for 13 minutes.
  3. Put this mixture in and cook on high.  Keep stirring this about every three minutes.  This tends to spatter, so I put a cover on so that my microwave does not get messy.
  4. Start monitoring the consistency after about 10 minutes.  Add the powdered elaichi at around the 10 minute mark.  At this point I start checking every minute.  By around 12 minutes, the consistency should be thick and kind of grainy.  It should not be very smooth and wet,
  5. Put it back in for about a minute at a time till the mixture leaves the sides of the bowl and has turned very slightly brown.  It should still be moist, and not totally hard and dry.
  6. Pour this out onto a greased plate and smooth it out.
  7. Top with the crushed pistachios or almond.
  8. Wait for it to cool a bit and then cut into desired shape and size.


Stays well in the refrigerator for about 2 weeks.


Monday, November 2, 2015

Aloo Roti (not Paratha)

We had a quiet Saturday after ages.  All of us were home through the day and so I suggested going out.  My husband picked an Indian restaurant in Boulder that serves South Indian food.  I am not so fond of this place – service is lousy and food is mediocre.  But since my husband wanted to, we went there.  Big mistake!  The buffet is one of the most expensive Indian buffets in the area and the food was terrible!  I have told my husband that he can go alone if he wants to eat at that restaurant!


Anyway – my son had a Halloween party to go to in the evening.  Since it was just the two of us for dinner, I made my 10 minute aloo subji and we had it with parathas and rice.  Some of this curry was left over and I used that to make the rotis today.  The potatoes had absorbed most of the moisture.  So I added a little water to make the dough.  They came out so well!

I am giving you the recipe to make it from scratch, but I made it with left over curry.

Here is what you need:


  • 2 medium sized potatoes, boiled
  • cumin seeds
  • salt to taste
  • ½ tsp. red chili powder
  • ¼ tsp. turmeric powder
  • 1 tsp. cumin powder
  • 1 tsp. coriander powder
  • ¼ tsp. hing
  • 2 tsp. oil
  • 2 cups whole wheat flour or chappati atta
  • warm water
  • ghee 


Here is how I made it:


  • Peel and mash the potatoes.  Add cumin seeds, salt, and all the powdered spices.  Mix well
  • Add the wheat flour.  Mix well. 
  • Add water a little bit at a time and keep mixing till you have a soft pliable dough.
  • Place dough on a floured surface and knead well for a few minutes
  • Cover with a wet paper towel and set aside for about 30 minutes
  • Make medium lime-sized balls with the dough.   


  • Take one ball of dough.  Dust this with dry flour/atta


  • Roll it out into a thin roti, dredging with flour as you roll.


  • Put roti on a heated tawa.  Let it cook on one side for a couple of minutes.  Flip it over and let it cook on the other side, till it is cooked though


  • Place these in a bread basket or clean towel and rub it with ghee.

Serve hot with a spicy curry.  I served these with a vegetable kurma.

Friday, October 30, 2015

Simple grated carrots and zucchini pulao

We had three parties for Navarathri.  With back to back parties on Friday, Saturday and Sunday, we ended up eating a lot of rich food three days in a row.  And – since we had a ton of leftovers, we continued eating rich food through the week.


By Thursday, I was ready for comfort food.  So made keerai (spinach), cabbage curry, and rasam.

I also had a lot of carrots and zucchini at home.  So yesterday, I made a simple but flavorful pulao, that takes about 20 minutes to make, but tastes great.  We had this with left over ghuguni and a salad.

Here is what you need:

  • 2 tsp. ghee
  • 1 tsp. cumin seeds
  • 2 -3 cloves
  • 1 cup basmati rice
  • salt to taste
  • 2 – 3 medium carrots grated
  • 1 zucchini grated 


Here is how I made it:

  1. Soak basmati rice in water for about 15 minutes.  Drain and set aside
  2. Heat ghee in a pot.  Add cumin seeds and cloves
  3. When the cumin changes color, add the rice and salt, and fry on medi
    um heat till it turns translucent.
  4. Add two cups of water.  Bring it to a boil.  Reduce heat to low.
  5. Cover and cook for about 10 minutes.
  6. Add grated carrots and zucchini.  Cover and cook for 5 more minutes.
  7. Turn off the heat.  Let this sit for 5 more minutes.
  8. Fluff with a fork to separate grains.


Serve hot with dal or curry of your choice.


Sunday, October 25, 2015

Falafels

We had a mini party at our place a couple weeks ago.  A few of our close friends came over.  We all had kids the same age.  When our kids were younger, we used to meet our friends regularly, because every Friday, kids would start asking for play dates and sleepovers.   We would also go regularly to Balvihar and could get updates on important and not so important events in each others' lives.

Now our kids are much older and several have gone away to college.  Of those still at home, some are applying to schools this year and others are busy with school and sports.


So now we have to plan ahead so that we can meet and catch up.  Since I planned this party a couple of weeks in advance, I sent out a poll on what cuisine people wanted to eat.  Mediterranean won!

It was a potluck.  For tapas, we had polenta with mushrooms and caramelized onions, hummus and roasted pepper fillo cups, baba ganoush, hummus, crackers, dolmades, and olives.  For the main course,  we had a mediterranean soup with harissa, green peas soup,  tabbouleh, couscous salad, quinoa salad, pita bread,  hummus, falafels, tzatziki sauce, lettuce and cucumbers, mediterranean rice, and for dessert, we had fruit tarts and fruits.

We all enjoyed both the dinner and the company.  


I have had this fantastic falafel recipe from my friend Neerja.  Neerja makes the most amazing appetizers, and had brought these to a party.  I followed her recipe exactly.  The falafels came out great!  I have reproduced her recipe here just as she sent it to me.  Thanks Neerja!


Here is what you need:


  • 1 cup dried chickpeas - Soak overnight
  • 5 dried red chillis - soak in a small cup of water for 30 mins.
  • 1 small onion - chopped
  • 5 cloves garlic - chopped
  • 1 small bunch Italian parsley - stems removed
  • 1 tsp. baking soda
  • 6 Tbsp. rice flour
  • 1 Tbsp. coriander seeds - grind in spice grinder
  • 1 tsp. cumin seeds - grind in spice grinder


Here is how I made it:


  1. Drain water from the chickpeas and dried red chilies. Using a food processor, Pulse to a coarse breadcrumb texture.
  2. Add onion, garlic, parsley, salt, coriander and cumin powders and pulse some more.
  3. Scoop the falafel mix into a dish, cover and refrigerate for at least 2 hours.
  4. After a couple hours have gone by, remove mix from the fridge. Add baking soda and rice flour to it. Mix well.
  5. Heat oil for deep-frying. Make small balls.
  6. Deep-fry slowly on medium heat until they turn nice and golden. The falafels will be crisp for many hours to come if fried this way.


Serve as an appetizer or as a pita sandwich


Thursday, October 15, 2015

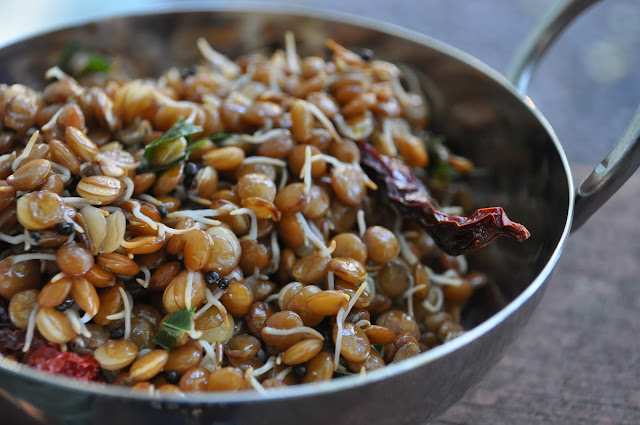
Sprouted Masoor Sundal

Navarathri has started and with it all the great sundal recipes.  On the first day of Navarathri, I had Parent-Teacher conferences – so my husband made sundal.  I soaked dried green peas the previous night and pressure-cooked them in the morning. My husband did the tadka in the evening.


On the second day (I almost feel like breaking out into the song “On the first day of Christmas..”) I was in a rush and forgot to soak something in the morning – so ended up making kadalai paruppu sundal (channa dal sundal).

Today – the third day, I made sprouted masoor sundal.  I had sprouted masoor matki over the weekend.  So decided to make sundal with it.

It is so quick and easy to make (of course you need to have the sprouting done)


Sprouted Lentil Stir Fry


Here’s what you need:


  • 1 tsp. oil
  • 1 – 2 red chilies
  • 1 tsp. mustard seeds
  • ¼ tsp. hing (asafetida)
  • 2 – 3 curry leaves
  • 1 cup sprouted whole masoor (red lentils)
  • salt to taste
  • graded coconut (optional)


Here’s how I made it:


  1. Heat oil in a pan.  Add mustard seeds.  When they sputter, add red chilies, hing and curry leaves.
  2. When the red chilies get slightly browned, add the sprouted masoor, salt an a little ware (I added about ¼ cup)
  3. Cover and cook on low heat till the lentils are cooked (about 10 minutes).
  4. Turn off the heat and add coconut (if you are using) and mix well.

That’s it!

Saturday, September 19, 2015

Simple Vendakkai Curry (Bhindi/Okra Fry)

Vendakkai used to be my kids’ favorite vegetable after potatoes.  This was when they were very young and finicky about the food they ate.  They used to have bhindi with rasam sadam (rice) or with rotis.  Both my husband’s family and my family knew this.  So every time we went to India, everyone made bhindi for my kids.  At one point my oldest asked me if that is the only vegetable that they know how to make :)
 

Bhindi / Okra Dry Curry


We get vendakkai in our Indian store regularly, but the quality is not always consistent.  Sometimes it is so fibrous that I end up discarding half of what I buy.  At other times, they are so tender and tasty that I can’t make enough.

I make vendakkai in several different ways.  If the bhindi is good, then I make it without too much masala so that we can taste the vegetable without letting the masalas overpower the taste.


Here is what you need:


  • 2 tsp. oil
  • ½ tsp. mustard seeds
  • ½ tsp. cumin seeds
  • ½ large onion, finely chopped
  • 2 green chilies, slit
  • 1 lb. okra, washed and cut into small rounds
  • salt to taste
  • ¼ tsp. turmeric powder
  • 1 tsp. red chili powder


Here is how I made it:


  1. Heat oil in a saucepan.  Add the mustard and cumin seeds.
  2. When the mustard seeds sputter, add the onions and green chilies.  Fry till they turn slightly brown.
  3. Add the cut okra, salt, and turmeric powder.  Mix well.
  4. Cover and cook on low heat, stirring occasionally, till the okra is almost cooked – about 8 minutes.
  5. Add the chili powder, and toss to coat the okra well.  Cook on medium heat for 5 – 10 more minutes, tossing the pan a couple of times. 

Serve with rotis, rice, and dal or rasam.


Wednesday, September 16, 2015

Potato Bajjis (or Aloo Pakoras as some people call them)

I have been without my kitchen (well almost) for about 2 weeks.  We got some work done and the kitchen looks great now, but I was itching to get back and do some serious cooking.  I did sneak in a couple of simple dishes while the work was going on though - a few things that did not require a lot of ingredients or cookware to make. 

Bajjis (some people call the Pakoras and most North Indian restaurants call them that) are super easy to make and don’t require a lot of advance planning.  In my house, they are an all time favorite snack, and I don’t think anyone has ever said no to bajjis, if I offer to make some.  


Aloo Pakoras


Some form of bajjis or pakoras is available throughout India.  In the south, we add a bit of rice flour to the batter, while my friends up north only use gram flour (besan). 

In Tamil Nadu, traditionally, bajji and sojji (sooji halwa) are served, with filter coffee of course, when a prospective groom comes for the first time to meet the bride’s family   I don’t remember what we served my husband when he came to my house for the first time.  I don’t know if he remembers.  Anyway – I don’t think it was bajji and sojji :)

Bajjis are a perfect snack for a rainy or cold day – best served with chai.


Here is what you need:

(to make about 20 – 30 bajjis)

  • 1½ cups besan (gram flour/garbanzo bean flour)
  • ½ cup rice flour
  • ½ - 1 tsp. red chili powder
  • salt to taste
  • water
  • 2 – 3 large potatoes, washed thoroughly and sliced thin (you can use a mandoline or a sharp knife – I just used a knife)
  • oil for deep frying

Note:  I would slice a couple of potatoes first and see if there is any batter left before slicing the third potato.  Depending on the size of the potatoes, you may only need two.


Here is how I made it:


  1. Heat oil in a kadai or a deep pot.
  2. While the oil is heating, mix the batter.  Add besan, rice flour, red chili powder, salt, and enough water to make a thick paste (like pancake batter).
  3. Make sure your oil is hot enough, by dropping a small ball of the batter into it.  If the ball rises to the surface immediately, then the oil is ready.
  4. Take the sliced potatoes, one slice at a time, and dip it into the batter to coat.  Drop it carefully into the hot oil.  You can fry a few at a time depending on how big your kadai is.  I normally fry about 6 – 8 at the same time.
  5. Gently turn the bajjis and fry them, on medium heat, till both sides are golden and the bajjis are crisp.  Remove and drain the oil in a colander lined with paper towels.
  6. Repeat till all the potatoes and/or the batter is done.


Serve hot with chutney or ketchup.  And don't forget the chai!


Tuesday, September 15, 2015

Semiya Upma - Vermicelli with vegetables

Upma is one of those dishes that you either love or hate.  I truly believe that it all goes back to your first memories of eating upma.  If the upma is made well – without lumps, and is nice and warm, you end up loving it.  On the other hand, if your first experience was lumpy upma, then you end up hating it.  My theory goes out the window though in the case of my family.  Both my brothers did not like upma (and they grew up eating the same upma that I ate) and my husband did not like upma either, even though my mother-in-law made it really well.


I love upma – in any form.  I love arisi upma, sooji upma, semiya upma, aval upma, quinoa upma – you get the idea. But because my husband did not like it, I did not make it often, saving it for days when he travels or when he has a business dinner.  In the 21 years that we have been married though, I have converted him.  Though he won’t crave upma (like I sometimes do), he actually enthusiastically agrees if I suggest upma for lunch or dinner – especially if we have been eating a lot of rich, heavy meals.

Upma is a dish that adapts to what you have on hand. You can make a simple upma with just ingredients for tadka and sooji.  Or you can add a ton of veggies and make it to suit your taste.

Here is a version of upma that I made recently.


Here is what you need:


  • 2 – 3 tsp. oil
  • ½ tsp. mustard seeds
  • 1 tsp. channa dal
  • 2 -3 green chilies, slit
  • few curry leaves
  • ½” piece ginger, slivered
  • ½ medium onion, chopped fine
  • 1 cup mixed vegetables (I used a frozen mix of corn, carrots, and peas)
  • salt to taste
  • 4 cups water
  • 2 cups roasted semiya (vermicelli) – see note


Here is how I made it:


  1. Heat oil in a pan.  Add mustard seeds.
  2. When the seeds sputter, add the channa dal.  Stir well and cook till the channa dal changes color.
  3. Add the green chilies, ginger, and curry leaves.  Mix well and fry for a minute or so.
  4. Now add all the veggies and salt.  I used frozen veggies.  You can add fresh veggies of your choice (carrots, beans, potatoes, peas, cauliflower, peppers – to name a few).   Let the veggies cook for a couple of minutes.
  5. Add water and turn the heat to high.  Let the water come to a boil.
  6. Add the roasted semiya and turn the heat to low.  Cover and cook for about 6 – 8 minutes until the semiya is cooked.


Fluff with a fork, and serve hot with chutney or pickle of your choice.  I mostly make it for lunch or sometimes a light dinner.  You can make this for breakfast too.

Note:   
  1. I used roasted semiya.  If your vermicelli is not roasted, you can dry roast it till it turns slightly golden and then follow the recipe.
  2. You can also add cashews when you season the upma for a richer, more festive version of the dish.

Related Posts Plugin for WordPress, Blogger...