Friday, September 27, 2013

Black-eyed peas vadas (Black-eyed peas fritters)


I love navrathri. It is one of my favorite festivals.  My mom did not keep golu (a display of dolls), but several people in our neighborhood did.  We used to walk from house to house, admiring their beautiful displays, singing bhajans (if you can imagine me singing!), and collecting packets of sundal (lentil/bean salads).

 Golu is handed down from the husband’s side of the family.  So when I got married, my mother-in-law helped me set me up my own golu.  My kids were much younger when I first started.  And being in the U.S., I did not have access to the huge variety of dolls available in Chennai.  We made do with a lot of Legos and Harry Potter figures.  No one seemed to mind and it was a lot of fun.

Blacy-eyed peas vadas

In the south, navrathri is mainly a women’s festival.  But with two boys in the house, I decided early on to include whole families in the celebration.  If navrathri spans two weekends, I have multiple parties, but if it includes only one weekend, then I have one massive party.

This year, navrathri starts on a Saturday and ends the following Sunday.  We also have the Monday after Saraswati Pooja off (teacher in service).  So I have decided to have multiple parties.   I have been looking for recipes that I can make for my various get-togethers.  This is one time of the year, that I don’t do potlucks. 

I saw this recipe for an African appetizer using black-eyed peas, called Accara.  It looked interesting.  Since I had found a big packet of these while cleaning my pantry, I decided to try it out.  I made some modifications to the original recipe, to make it more Indian.


The original recipe asks that you peel away all the skin from the black-eyed peas, but I did not.   After soaking for a while, I squished the black-eyed peas till some of them popped out of their skin.  So by the time I was done, maybe half of them had popped out. 

Here is what you need:

(To make about 20 - 25 fritters/vadas)

  • 1 cup black-eyed peas, soaked for at least 8 hours
  • ½ cup chopped onions
  • 3 – 4 green chilies, chopped
  • 1 – 2” piece ginger, minced
  • ½ cup chopped cilantro
  • ¼ cup besan (chickpea flour)
  • salt to taste
  • 1 tsp. hing (asafetida)
  • oil for deep frying


Here is how I made it:


  1. Heat oil in a kadai/saucepan on medium heat.
  2. Wash the black-eyed peas, and try to get the skin off about half of them, by squeezing them till they pop.
  3. Drain the peas and put them in a food processor.
  4. Pulse them into a coarse paste without adding water.
  5. Add the chopped onions, green chilies, ginger, cilantro, salt, and hing.  Mix well.
  6. If you are not able to shape these into balls (or if they disintegrate in the oil), add the besan and mix.
  7. Shape into balls and deep fry in hot oil on medium heat.  Let this cook slowly so that the outside is nice and crispy and it is cooked well on the inside.
  8. Repeat till all the batter is done.


Serve hot with chutney/spicy chili sauce

I am thinking of making these ahead of time for the party and warming them up in the oven just before people arrive.


Wednesday, September 25, 2013

Vegetarian Lasagna Roll-ups


I have been cooking mostly Indian food for dinner for a while, and felt ready for something different.

While cleaning up my pantry last week, I found as box of long- forgotten lasagna noodles.  I used to make lasagna or some kind of baked pasta dish quite often.  When my kids were a bit younger, their friends would come for sleepovers and pasta was always a big hit with them.  Since most of the recipes I followed for baked pasta dishes served 8 – 10 people, it worked out well and I did not have too much left over after the sleepover.


Now, with just the three of us at home, when we have Italian – it is spaghetti with some store-bought pasta sauce and French bread, served with olive oil and fresh ground pepper. 

I wanted to use the lasagna noodles, but did not feel like making a big pan of baked veggie lasagna.  So I improvised a bit and made lasagna roll-ups.  I saw a meat-based recipe for this in a magazine and adapted it to suit my vegetarian kitchen. The advantage with this recipe is that you can make as little or as much as you need.  It also gave me a chance to use up some of the zucchini I had from my garden.


Here is what you need:

(Serves 4)


  • 8 lasagna noodles
  • 2 tsp. olive oil
  • 1 cup zucchini, chopped
  • ½ cup mushrooms, chopped
  • 1 cup spinach, chopped
  • salt to taste
  • freshly ground pepper
  • red chili flakes
  • 1/3 cup low fat cottage cheese
  • ½ - ¾  cup shredded Italian cheese
  • 16 oz. pasta sauce (I love the White Linen Collection, Gourmet Pasta Sauces, Victoria All Natural Marinara sauce from Costco)

Here is how I made it:

  1. Cook the lasagna noodles according to package directions.
  2. Preheat oven to 350°F.
  3.  While the noodles are cooking, heat oil in a pan.
  4. Add zucchini, mushrooms, and spinach.  Sauté for a couple of minutes.
  5. Add salt, pepper, and red chili flakes. Sauté for a couple of more minutes.  Turn off the stove.
  6. Add the cottage cheese and half of the shredded Italian cheese.  Mix well.
  7. In a baking dish, spoon a little bit of the pasta sauce to cover the bottom.
  8. Place the lasagna noodle, one at a time on a cutting board.  Spread a little bit of the veggie mixture on the noodle and roll it up (like you would roll up an ace bandage).  Some of the filling will spill out.  You can scoop it out and put it into the baking dish.
  9. Place the rolled up noodles on the baking dish, seam side down.
  10. Repeat with rest of the noodles.
  11. Spread the remaining pasta sauce on top of the rolled up noodles.
  12. Sprinkle the remaining shredded cheese on top.
  13. Bake for about 15 – 20 minutes until the cheese is melted.
Serve with a side salad and bread of your choice.

Note 1:  Both my husband and I are not big cheese lovers.  So I added very little cheese.  You can add more cheese if you like.   I also like to sprinkle some hot chili garlic sauce on my share – just to spice it up a bit. 

Note 2:  If, after baking, the pasta seems too dry, just warm up a little bit of the pasta sauce in a microwave (covered) safe dish and pour it on top of the pasta.

Sunday, September 22, 2013

Thenkuzhal


I grew up in Chennai long before Grand Sweets became THE place to buy murukku and thattai.  Every weekend, my mom would make a couple of different types of bakshanams (salty, fried snacks or farshans).  She would make mullu thenkuzhal or thattai, or ribbon pakoda or some such thing.  My older brother and I were big snack eaters and would polish off these big dubbas (containers) during the week.  According to my mom, “nowadays, nobody makes any bakshanams at home – even for festivals” (sounds better in tamil).


I don’t make bakshanams (farshaans / namkeens/ fried salty snacks) that often, because I end up eating most of it. I make some during deepavali, but that is it.  My husband can take one or two murukkus or thatais in his hand and be done.  I can’t understand how he does this.  The box of goodies will be sitting right in front of him and he can just ignore it!  I tend to graze.  Every time I pass by the pantry, or open the pantry door, or see someone else taking one to eat, I also have to.  It is my weakness.  What can I say - I have no control.  It also probably explains why he has not put on any weight since we got married and I have "blossomed".


My oldest has been away at college for almost 4 weeks now.  Was thinking of sending him a care-package.  Along with some toasted almonds and some store bought snacks, decided to send him some home-made thenkuzhal.  Wikipedia has a video of someone making this.  Here is the link. 

Here is what you need:


  • 4 cups rice flour
  • ¾ cup urad flour
  • salt to taste
  • 1½ tsp. cumin seeds
  • 1 tsp white sesame seeds
  • 3 Tbsp. melted butter
  • ½ tsp. hing (asafetida)
  • water to make the dough
  • oil for deep frying

Thenkuzhal

Here is how I made it:


  1. Heat oil for deep-frying.
  2. Meanwhile, put the rice flour, urad flour, salt, cumin seeds, sesame seeds, and hing in a bowl.  Mix well
  3. Pour the melted butter and add water a little at a time to make it into a stiff dough.
  4. Make a big ball of dough and put it into the thenkuzhal press with the appropriate disc.
  5. While swirling, squeeze out enough of the dough into the hot oil.  You can make three or four at a time, depending on the size of the pan you use for frying.
  6. Reduce heat to medium and cook till both sides are done.  Drain on paper towel.
  7. Repeat till all the dough is done.
  8. Once the thenkuzhal is cool, store it in an airtight container


Friday, September 20, 2013

Black-eyed Peas Curry (Lobia/Karamani)


I recently made black-eyed peas for a colleague who had just had a baby, along with some jeera pulav, baby potatoes and bell peppers, cauliflower curry, and kachumber (Indian-style salad).  She kept raving about how wholesome the meal was and how if she had vegetarian food like this, she won’t even miss eating meat.

Black-eyed Peas Curry

While cleaning my pantry this past weekend, I found a big packet of black-eyed peas along with other beans. So, when my friend asked me to post a recipe with black-eyed peas, I had no problems.  I don’t make these as often as I make cholé or rajma – mainly because it is not a staple in my pantry.  I have to remember to buy it (and looks like after I remember to buy it, I forget that I have it in my pantry!). 

I make some kind of dal (lentil) or beans at least once a week.  My younger son likes it when I make dals/beans that hold their shape.  So if I say I have made dal for dinner, he will want to know if it is the mushy kind or the beany kind :)

Here is what you need:

(serves four easily)

  • 1½ cups black-eyed peas, soaked for at least 4 hours (see note)
  • salt to taste
  • ½ tsp. hing (asafetida)
  • ¼ tsp. turmeric
  • 2 tsp. oil
  • ½ tsp. mustard seeds
  • 1 tsp. cumin seeds
  • ½ of a medium onion, chopped
  • few curry leaves
  • 3 cloves garlic, sliced
  • 1” piece ginger, slivered
  • 3 green chilies, slit lengthwise
  • 1 roma tomato, chopped
  • 1 tsp. rasam powder
  • generous amount of cilantro (maybe about 1/3 cup)


Here is how I made it:


  1. Drain the water from the soaked peas, add more water to cover it and cook with salt, hing, and turmeric in a pressure cooker, until done.  Since these beans cook very quickly, I cook it on low for about five minutes after the first whistle, and then turn it off.
  2. Heat oil in a frying pan and add mustard and cumin seeds.
  3. When the mustard seeds sputter, add the onions and curry leaves. Sauté for a few minutes.
  4. Add garlic and ginger.  Sauté for a few more minutes.
  5. Add the tomatoes.  If your tomatoes are juicy, just cover the pan and cook on low heat for a bit, if they are not, sprinkle some water and then cover and cook till the whole thing gets pulpy, and the tomatoes have lost their shape.
  6. Add rasam powder and fry for a couple of minutes.  If you don’t have rasam powder, add ½ teaspoon each of chili powder, cumin powder, coriander powder, and crushed pepper.
  7. Add the cooked peas with enough water to this pan.  Check the seasoning, and let this whole thing simmer for about 10 minutes till the peas have absorbed all the flavors.
  8. Add the cilantro and turn off the stove.


Serve with rice or rotis.  I like to eat this more like a soup.  I take a tiny bit of rice in a big bowl, ladle a generous portion of the black-eyed peas on top, and garnish with slivered green chilies and onions and eat it like a soup.  It tastes delicious.

Note:  This is a great crock-pot recipe.  If you like, you can place the dry black-eyed peas in a crock pot with enough water and cook it on low for about 4 – 6 hours, till the peas are tender.  Then follow the steps to make the masala.  Add the tomato masala to the peas, and let it simmer in the crock pot for at least an hour.

Wednesday, September 18, 2013

Spinach with yellow peas and moong dal

-->
With school closed for so many days, I have been in full cleaning mode.  Cleaned my pantry, got my husband to clean up the bills and various statements we receive, had my younger son clean his closet,  all of us cleaned the garage, and today, I worked on my freezer. 


Spinach with yellow peas

I tend to use my freezer a lot.  When I have a lot of leftovers, I put them in either airtight containers or in the freezer safe Ziploc bags and save them for a day when I am scrambling to make dinner.

Sometimes though, I forget what I have saved.  And it helps to have days like today when I have time to go through and take stock of the food I have saved up for a rainy day.  It was mostly things I knew I had – only a couple of surprises – some bisibele bath, and about a cup or so of boiled yellow peas.


I had chopped up some baby spinach and was going to make it like I normally do – with moong dal.  With the discovery of frozen yellow peas, I decided to change up the recipe a bit.  It came out great!

Here is what you need


  • ¾ cup moong dal
  • 1 cup cooked yellow peas (soak dried peas for 5 hours or so – pressure cook with a bit of salt, turmeric powder and hing - asafoetida, till peas are cooked)
  • 1 lb. baby spinach, washed and chopped
  • salt to taste
  • 2 tsp. oil
  • ½ tsp mustard seeds
  • 1 tsp. cumin seeds
  • 2 red chilies
  • ½ medium onion, chopped
  • 3 cloves garlic, chopped
  • ½” ginger, minced
  • 1 tsp. rasam powder

Here is how I made it:


  1. Pressure cook the moong dal on low heat for about 7 – 8 minutes after the first whistle.  Set aside
  2. If you have left over cooked yellow peas, you can use that, if not please boil the peas until cooked.
  3. Add enough water to the spinach and cook on medium heat till the spinach is wilted.  Drain most of the water out and return to the stove.
  4. Add the moong dal, yellow peas, and salt.  Let this simmer on low heat.
  5. In the mean time, heat oil in a skillet.  Add the mustard seeds and cumin seeds.
  6. When the mustard seeds sputter, add the red chilies, and fry for 30 seconds.
  7. Add the chopped onions, garlic, and ginger.  Fry till the onions turn translucent. 
  8. Add the rasam powder and fry for a couple of minutes.  If you don't have rasam powder, add a little bit of chili, cumin, and coriander powders instead.
  9. Add this to the spinach.  Let it simmer for five more minutes.


Serve hot with rice or rotis.


Monday, September 16, 2013

Rajma


I had soaked for rajma yesterday.  It was Sunday.  I hadn’t made it in a while.  My youngest likes it a lot.  So thought, one dish dinner – serve it with rice and I am done.

It had finally stopped raining and we got e-mail from my son’s school saying that most likely they will open on Monday – after being closed Thursday and Friday due to rain.

We visited a friend of ours, whose mom was going back to India.  They live in Boulder, which was more affected by the rains than our part of town.  We could see a lot of people ripping out carpets from flooded basements and setting water-damaged furniture on their driveways.  We also drove by a couple of road closures and several swollen streams.  This storm caused a lot of damage.

While we were chatting, Boulder Valley School District sent out a notification saying that schools were going to be closed both Monday and Tuesday.  The kids were ecstatic!  All the moroseness of having to finish up homework and getting ready for school the next day vanished!  


Rajma - Chawal


So we stayed a bit longer, had chai, chatted some more, and by the time I came home, felt too lazy to make Rajma.  More than feeling lazy, I did not want to take pictures of my dish after dark.  I feel that my pictures come out better in natural light than at night.  So, I just thawed some chole and paneer.  We had them with rotis.  My tam bram husband of course had left–over rasam with vadams (popadums).  Beacuse of this, my rajma ended up soaking for over 24 hours.  

Rajma is such a simple, delicious, and wholesome dish to make.  I understand that in some households, rajma-chawal (rice) is considered comfort food. 


Here is what you need:


  • 2 cups rajma (red kidney beans), soaked overnight (or at least 5 hours)
  • salt to taste
  • pinch of hing (asafetida)
  • 2 – 3 tsp. oil
  • ½ medium onion, finely chopped
  • 2 roma tomatoes, finely chopped
  • 2 green chilies, minced
  • 1 tsp. chili powder
  • 1 ½  tsp. jeera (cumin) powder
  • 1 ½ tsp. dhania (coriander) powder
  • 1 tsp. kasuri methi (dried fenugreek leaves)
  • 1 tsp. amchur (dried mango) powder (optional)
  • cilantro for garnish (also optional)


Here is how I made it:


  1. Drain and rinse the rajma.  Cover with water, add salt and hing.
  2. Pressure cook the rajma for about 10 – 12 minutes after the first whistle, on low heat.
  3. While the beans are cooking, heat oil in a pot.  Add onions and fry for a few minutes.
  4. When the onions are starting to change color, add the chopped tomatoes and green chilies.  Fry for a couple of minutes.
  5. Add the chili, cumin, and coriander powders.  Add amchur if you are using it.  Add a little bit of water and cook on low heat.
  6. Take the kasuri methi in the palm of you hand and crush it with your other hand (hope this makes sense).  Sprinkle this on the tomato masala. 
  7. Add some more water (very little) and cook till the tomatoes have kind of lost their shape and have disintegrated.
  8. Now, add the cooked beans with enough water.  Check to make sure that the salt is sufficient.
  9. Cover and let it simmer on low heat for about 10 more minutes.
  10. Garnish with cilantro.

Serve hot with rice (or rotis)

Note:  Rajma is a very simple dish.  You can make it without adding all the masalas and it still tastes great.  I add amchur powder to give it a bit of tanginess.  You don’t have to.  Some people grind or puree the tomatoes or the onion-tomato mixture.  I don't - mainly because I like the texture of the chopped veggies.


Thursday, September 12, 2013

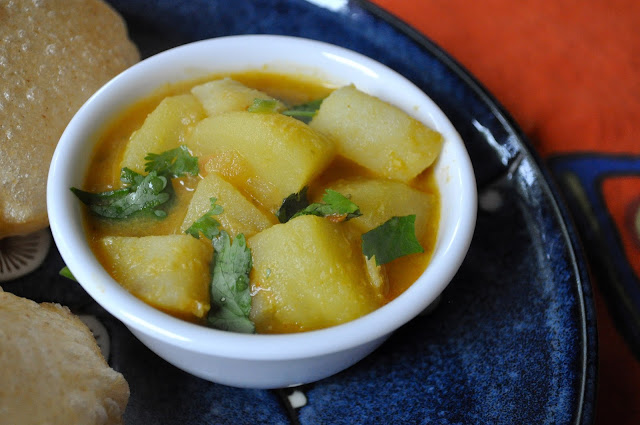
Potato curry for pooris

-->
It has been raining for the past couple of days, almost continuously.  I have lived for over 19 years in Colorado, and this has never happened.  There is so much flash flooding that schools have closed.  Even with 6" – 8” of snow, our schools never close, but apparently the roads are flooded, and in some places getting washed out, that they decided to close them today.  The university is closed both today and tomorrow.  Most people who work in Boulder have stayed home.

My husband went to work only to find out that their campus is also shutting down and so is going to head back.

Wow!

Potato curry for pooris

Well, with this really unusual gloomy, wet weather and with both my husband and younger son home for lunch on a weekday, I decided to make pooris and potatoes.  I don’t know anyone who does not like pooris and potatoes.  There are various recipes for the potato masala.  Some are really simple and some very elaborate.  I really like this recipe.  It tastes more like a kurma, but is still relatively simple to make.  A friend of mine used to make egg curry with this masala.  Since my younger son (actually both my kids) doesn’t like boiled eggs, I make this with potatoes instead.

Here is what you need:


  • 6 – 8 medium sized potatoes, boiled, peeled, and cubed (you can also add some cauliflower to this)
  • ½ cup grated fresh or frozen coconut
  • 4 – 6 cashew nuts
  • 4- 6 green chilies
  • 1 tsp. fennel seeds
  • 2 – 3 cloves garlic
  • 1”piece ginger
  • 2 tsp. oil
  • 1 tsp. cumin seeds
  • 2 – 3 cloves
  • 1 bay leaf
  • 1 medium onion, chopped
  • 1 tomato, chopped
  • ¼ tsp. turmeric powder
  • salt to taste
  • ½ - 1 tsp. chili powder
  • cilantro for garnish


Here is how I made it:


  1. Grind together the coconut, cashews, green chilies, fennel seeds, ginger, and garlic to a smooth paste.  Set aside.
  2. Heat oil in a pan.  Add the cumin seeds, cloves, and bay leaf.
  3. When cumin seeds change color, add the chopped onions and fry till they become translucent.
  4. Add the tomatoes, turmeric powder, salt, and chili powder.  Fry on medium heat till the whole thing becomes pulpy. 
  5. Add the ground masala and fry till all the water evaporates.
  6. Add the boiled and diced potatoes and enough water to cover them.  Bring to a boil and reduce heat to low.  Simmer for about 10 minutes.
  7. Garnish with chopped cilantro.


Serve hot with pooris or rotis.


Avial


In most tamil weddings, the lunch after the ceremony is served on banana leaves and will typically have avail as one of the menu items.  It is also something that we make at home for any celebration meal.  It has such a festive feel to it.


Avial

Maybe because it is mostly made for special occasions, avial has this reputation of being an elaborate, gourmet dish, which is difficult to make.  At least that was my take on it.  Once I started making it though, I realized it was super easy to make and really hard to mess up.  It has very few ingredients and does not require much cooking time.  The hard part is cutting all the veggies.

If you live in India, you have access to all the veggies that go into it– white pumpkin, yellow pumpkin, beans, carrots, plantains, potatoes, chow-chow, drumstick etc. easily.  Our Indian store only gets vegetables on Thursdays and does not always get the white pumpkin, yellow pumpkin, and drumsticks.  So if I want to make avial, I have to plan in advance.  Now, when I see these veggies, I buy them, cut them into the right size and freeze them up.  


My friend Anu, asked me to post a recipe for avial.  I had already cut and frozen the pumpkins, it wasn’t that difficult to make.

Here is what you need:


  • Veggies of your choice cut into long thin strips – I used one carrot, one plantain, one medium sized potatoes, one medium drumstick, ½ small acorn squash, 4 green beans, and about 1 cup of white pumpkin (you can add arbi – cook it separately, and eggplant too)
  • salt to taste
  • ¼ tsp. turmeric powder
  • ½ - ¾ cup grated fresh or frozen coconut
  • 4 – 6 green chilies
  • 2 tsp. cumin seeds
  • 1 cup thick yogurt, beaten (I know friends who use sour cream instead of yogurt and it comes out just as well - may be creamier)
  • 2 tsp. coconut oil
  • some curry leaves


Here is how I made it:


  1. Bring water to boil in a big pot with a little bit of salt and a pinch of turmeric powder.
  2. Add veggies to this water one at a time, in the order that it takes to cook them – adding veggies that take longer to cook first and adding the white pumpkin in the end.  I added drumstick, beans, potatoes, carrots, plantain, acorn squash and then the white pumpkin – in that order with a gap of two to three minute between each.
  3. Cook till all the veggies are done, drain the water and return the pot to the stove.
  4. While the veggies are cooking, grind the coconut, green chilies, and cumin seeds to a fine paste with a little bit of water.
  5. Add this to the pot with the cooked veggies. Stir to mix well.  Let this heat through.
  6. Turn off the stove. Add the yogurt and mix well.  Taste to adjust the salt.
  7. Heat the coconut oil in a small pan.  Turn off the stove.  Add curry leaves to the hot oil and pour it over the avial.
  8. Mix well.

Enjoy with rice and papads.


Saturday, September 7, 2013

Zucchini Pakoras


I have a vegetable garden in my backyard.  The past couple of years we have been traveling in summer and so I have not been able to plant veggies in my garden.  We traveled this year too, but came back early enough in June that I could plant some veggies and still get a harvest even with the short growing season in Colorado.

Zucchini Pakoras
In my garden,  I have garlic, okra, eggplant, tomatoes, peppers, zucchini, cucumbers, green beans, yellow squash, acorn squash, and green peas (that never grew).  When I first started gardening, I made the mistake of planting four zucchini plants.  Little did I know that I would be harvesting more zucchini than either my family or my friends could consume.  Thankfully, I had some local charities that would accept fresh produce as donation!

This year (learning from my previous experience), I only have one plant and am still unable to keep up with the amount of zucchini it produces.  I can only make so much zucchini bread or pasta salad with fresh veggies!


Today, a friend of mine has called us for dinner.  I offered to make appetizers.  Since it is only four or five families, I made rasa vadas.  I also thought that this might be a good time to make a dent into my zucchini harvest and decided to make some pakoras but substituted zucchini instead of onions.  The pakoras came out well. 

Note 1:  Zucchini has a lot of water content.  Even though I squeezed out a lot of the water, since I made the batter in one batch, by the time I fried my last set of pakoras, the batter had become more watery.  So, the next time I make them, I will mix the batter in batches.

Note 2: My husband tasted the first batch I fried and said that he couldn’t really taste the zucchini.  So I added some diced zucchini to the batter for the rest of the batches.


Here is what you need:


  • 1 large zucchini, grated and set in a colander
  • 1 cup besan (garbanzo flour)
  • ¼ cup rice flour
  • salt to taste
  • 1 ½ tsp. chili powder
  • ½ tsp. carom seeds (ajwain/omam)
  • pinch of hing
  • oil for deep frying

Here is how I made it:


  1. Let the grated zucchini sit for a while in the colander.  Squeeze out as much water as you can.
  2. Heat the oil for deep-frying in a deep pan.
  3. Combine the besan, rice flour, salt, red chili powder, carom seeds and hing.
  4. Pour a teaspoon or two of hot oil on this.  Mix well.
  5. Add the zucchini and mix well. (See notes above)
  6. Drop spoonfuls of batter into the hot oil and fry on medium heat till the pakoras are crispy.
  7. Repeat till all the batter is done.

Serve with chutney and garam (hot) chai.


Lemon / Lime Rice


Does this ever happen to you?  You go to the grocery store.  Buy all the things you think you need.  Come back home and realize that you already bought some stuff the last time?  I did this twice – with limes.  

I used to be big on lists and would write everything down.   Then somehow, I got out of that habit and started relying on my memory.  And end up with half a dozen more limes than I need.  I should go back to my lists :).

Lemon Rice
So anyway, what do you do when life gives you an excess of limes – make lemon rice. This is so easy to make and tastes delicious.  All you need is some left over rice and lemons or limes.


Here is what you need:


  • 2 tsp. oil
  • ½ tsp. mustard seeds
  • ½ tsp. cumin seeds
  • ¼ tsp. hing
  • 2 red chilies, broken
  • 1 tsp. channa dal
  • 2 Tbsp. peanuts
  • 2 Tbsp. cashew nuts
  • 2 green chilies, slit
  • few curry leaves
  • 1” piece ginger, finely chopped
  • ¼ tsp. turmeric powder
  • juice of 2 – 3 limes or 1 large lemon (depending on how juicy they are)
  • salt to taste
  • 2 cups cooked rice (preferably long grain), cooled completely – left over rice works great!


Here is how I made it:


  1. Heat oil in a pan.  Add mustard seeds, cumin seeds, hing, red chilies, and channa dal.
  2. When the mustard seeds sputter, add the peanuts and cashew nuts.  Fry for a couple of minutes till the nuts start changing color.
  3. Add the green chilies, curry leaves, ginger and turmeric powder.  Sauté for a couple of more minutes.
  4. Turn off the heat and pour in the lime/lemon juice.  Add salt.
  5. Take the rice in a bowl.  Pour the lemon rice mixture on top.   Mix well so that every grain of rice is coated.  Taste to adjust salt.  If your lemon rice tastes too tart, mix in some more plain rice.  If it needs more of the lime/lemony taste, add more juice.


Serve hot with papads.


Thursday, September 5, 2013

Vendakkai (Bhindi / Okra) with Nalla Karam Podi


My wonderful friend, Anu, introduced me to nalla karam podi a few years ago.  Her mom makes the best avakkai.  She makes it fresh every summer and will save some for all of us.  Whoever goes to India in summer will bring it back and mail it to the rest of us.  Anu mailed me nalla karam podi with the avakkai once.  I would secretly indulge in steaming hot rice mixed with this spicy powder and a little bit of sesame oil for lunch some days.

This time when I went to India, my mom’s friend was visiting from Hyderabad and she brought back nalla karam podi.  She actually brought back so many packets that I though I should find other uses for it.  So I decided to try it as a masala for my dry subzis (vegetable dishes).

Okra with nalla karam podi

I don’t know how to make this spice mix from scratch, but there are several recipes on other food blogs.

Here is what you need:


  • 2 tsp. oil
  • ½ tsp. mustard seeds
  • ½ tsp. cumin seeds
  • ½ large onion, finely chopped
  • 1 lb. okra, washed and cut into small rounds
  • salt to taste
  • ¼ tsp. turmeric powder
  • 2 tsp. nalla karam podi

Here is how I made it:


  1. Heat oil in a saucepan.  Add the mustard and cumin seeds.
  2. When the mustard seeds sputter, add the onions and fry till they turn slightly brown.
  3. Add the cut okra, salt, and turmeric powder.  Mix well.
  4. Cover and cook on low heat, stirring occasionally, till the okra is almost cooked – about 10 minutes.
  5. Add the nalla karam podi, and toss to coat the okra well.  Cook on medium heat for five more minutes.

Serve with rotis, rice, and dal or rasam.

Ragada Pattice


I had “Ragada Pattice” for the first time in my friend Swati’s house.  This chaat is called Aloo Tikki Channa in Chennai.  I have had aloo tikki channa on numerous occasions.  The difference between the two is probably the beans used to make the gravy and also the way in which the aloo tikki/ pattice is made.  It is quite easy to make and even though it looks time consuming, it is not.

Ragada Pattice

I made this a couple of days ago for dinner.  I was just starting on the pattice when my husband came home from work.  He ate the hot-off-the-tawa tikki and declared it delicious.  He then had a couple with the ragada and praised it even more.  Even thought I don’t expect praise for my cooking, it fells good to get some enthusiastic response occasionally.

I used red potatoes for the pattice.  These are a little more moist than russet potatoes (I think) and so I add a little bit of all purpose flour to the mashed potatoes, so that they hold their shape.  So, after you mash the potatoes and mix in the other ingredients to make the cutlets, try shaping them.  If it is difficult, then add some all purpose flour to help bind the potatoes.

Here is what you need (easily serves a family of four):


For the ragada:

  • 2 cups dried yellow peas (vatana), soaked for at least 5 hours
  • salt to taste
  • pinch of hing(asafetida)
  • ¼ tsp. turmeric
  • 2 tsp. oil
  • ½ tsp. cumin seeds
  • ½ medium onion, finely chopped
  • 3 cloves garlic, crushed
  • 1” piece ginger, minced
  • 1 tomato, finely chopped
  • 1 – 2 green chilies, chopped
  • 1 tsp. coriander powder
  • 1 tsp. cumin powder
  • 1 tsp. red chili powder
  • finely chopped cilantro for garnish


For the pattice
(to make about 20 – 24)

  • 10 medium sized potatoes (I used red), boiled
  • salt to taste
  • ½ tsp cumin seeds
  • 2 green chilies, chopped
  • ¼ tsp. turmeric powder
  • a little bit of flour to bind (if necessary)
  • oil to shallow fry

To serve:

  • finely chopped onions
  • imli chutney
  • sev
  • chaat masala
  • chili powder

Here is how I made it:


For the Ragada:

  1. Pressure cook the soaked peas with enough water, salt, turmeric and hing till done (I cook it for about 10 – 12 minutes on low heat after the first whistle).
  2. Heat oil in a pan. Add cumin seeds.
  3. When the seeds change color, add onions and sauté till they become translucent.
  4. Add the garlic and ginger.  Sauté for a couple of minutes.
  5. Add the tomatoes and green chilies.  Cook on medium-low heat till almost all the water from the tomatoes has evaporated and the whole thing looks pulpy.
  6. Add cumin, coriander, and chili powders.  Mix well.
  7. Now add the cooked peas. Check the seasoning.  Adjust salt if necessary.
  8. Let this whole thing simmer on low heat so that the peas can absorb all the flavors.

For the pattice:

  1. Peel and mash the potatoes.
  2. Add salt, cumin seeds, green chilies, and turmeric powder.   Mix well.
  3. Try and shape it into cutlets.  Add flour if necessary.
  4. Heat oil in a frying pan.
  5. Place 6 – 8 cutlets in the pan and let it brown on each side for about 5 minutes on medium heat.
  6. Repeat till all the potatoes are done.

To serve:

  1. Place a couple of pattice in a serving dish.
  2. Pour some of the ragada on top.
  3. Sprinkle onions, cilantro, imli chutney, chaat masala, chili powder, and sev on top.
  4. Enjoy!

Sunday, September 1, 2013

Paneer with red and green bell peppers


I just dropped off my oldest son in college.   We spent one whole day setting up his dorm room and shopping for things I think he will need.  I probably went overboard, but he indulged me.  It was really tough to let go.  I know he will make the right choices and being away from home will help him grow as a person and will teach him responsibility.  I went away for my undergraduate education and so did my husband, but somehow, things seem to change when you are sending off your child. Things have changed so much since my college days – he is only a phone call or a text message away, so it is really not so bad.

I gave him a few hugs and shed a few tears on the phone to my husband and my friends.  Now, am trying to get back to my routine knowing that he will be back for Thanksgiving.  This is one of his favorite dishes and I made it the week before he left.

Whenever I make some paneer dish at home, my kids don’t complain about having to eat “Indian” for dinner.  They love paneer in any form – I can grill it, sauté it, make it into a gravy, add it to pizza, or to pulav, and they will eat it.

Paneer with red and green bell peppers


I almost always have a block of paneer at home.  It lends itself to a variety of dishes and on days when I make some total tam bram (Tamil Brahmin) dish that my kids won’t eat, I can quickly whip up a paneer dish and serve it with rotis.

Here is what you need:


  • 2 tsp. oil
  • 1 tsp. jeera (cumin seeds)
  • ½ large onion, sliced
  • 2 green chilies, slit
  • 2 cloves garlic, crushed
  • ½ tsp. chili powder
  • ¼ tsp. turmeric
  • 1 tsp. cumin powder
  • 1 tsp. coriander powder
  • 1 tsp. amchur (dried mango) powder
  • 1 green bell pepper, thinly sliced
  • 1 red bell pepper, thinly sliced
  • 1 block of paneer , cut into cubes
  • salt to taste
  • cilantro for garnish

Here is how I made it:


  1. Heat oil in a sauce pan.  Add cumin seeds
  2. When the seeds change color, add the onions and green chilies.  Sauté for a few minutes.
  3. Add garlic and fry for some more time.
  4. In a small bowl, take the chili powder, turmeric, cumin powder, coriander powder, and the amchur powder.  Add a little bit of water and mix well.  I learned this trick from my friend, Usha.  This keeps the spices from getting burnt.
  5. Add this to the saucepan.  Cook on medium heat till the spices are well blended and water is almost evaporated.
  6. Add the peppers and sauté for five minutes.
  7. Now add the paneer.  Toss to blend well.  Cook on low heat for about 5 - 10 minutes so that the paneer absorbs all the flavors.
  8. Garnish with cilantro.


Serve with pulao or rotis.

Related Posts Plugin for WordPress, Blogger...