Saturday, December 28, 2013

Sprouted Horsegram Dal Vadas

On one of our recent trips to India, we stayed for a few days with our friends in a small town near Mangalore.  While we were there, Anand, our host, made molagai podi (some people call it gun powder) with horsegram dal.  It gave the molagai podi a great nutty flavor and I thought I should try it out.


Horsegram Vadas

I have never used horsegram dal before.  In Tamil, it is called kollu (kulith in hindi – I think), and is typically used in cattle feed.

I bought horsegram dal and do use it to make molagai podi here now.  The thing with buying groceries here in the U.S. though, is that you can’t buy in small quantities.  I had to buy a 2 lbs. bag of horsegram dal even though I only needed a little for the molagaipodi.  So I had to try and figure out other ways to use up the rest of the dal.

Since it looks very similar to moth, and I have successfully sprouted moth to make usal, I decided to sprout horsegram dal too.  It sprouted really well.


A friend of ours had called us for dinner and asked me to make an appetizer.  I had some chopped keerai (amaranth) left over and had been meaning to make keerai vadai for the longest time.  I just soaked my usual dals as if I were making masala vadai, but added the sprouted horsegram dal also while making the batter and mixed in the amaranth leaves.
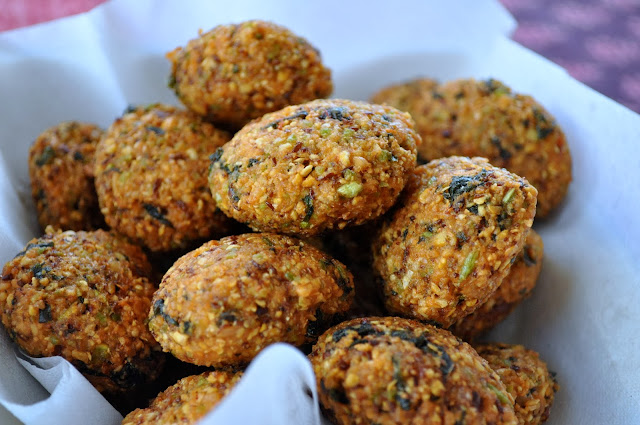
Note:  I learned the hard way that horsegram dal has stones that need to be picked out.  Sorry Sanjay, Swati and anyone else who got “lucky”.  Please clean the dal before soaking.


Here is what you need:

(makes about 50 vadas)

  • ½ cup horsegram dal (please pick out the stones!!!!)
  • ½ cup channa dal
  • ½ cup toor dal
  • ½ cup green split peas
  • a small handful urad dal
  • a small handful moong dal
  • 4 – 6 green chilies
  • 4 red chilies
  • 1” piece ginger
  • ½ tsp. hing
  • 1 – 2 cloves garlic
  • salt to taste
  • 1 cup amaranth leaves, washed and chopped
  • ½ medium red onion, chopped
  • 1 sprig curry leaves
  • oil for deep frying


Here is how I made it:

  1. Soak the horse gram dal overnight.  Drain the water, place the dal in a bowl and cover with a wet cloth or paper towel.  Let it sprout for a couple of days.
  2. Soak all the other lentils together for a couple of hours.
  3. Drain the water out and grind these along with the sprouted horsegram dal, green chilies, red chilies, ginger, garlic, hing, and salt, to a coarse paste, adding little or no water.
  4. Add the chopped amaranth leaves, onions, and curry leaves.  Mix well.
  5. Heat oil for deep frying in a deep pan or kadai.
  6. Make lime size balls of the batter, flatten it slightly and gently drop it into the oil.  You can fry 5 -6 vadas simultaneously.
  7. Fry the vadas on medium-low heat, turning them over occasionally, till they are golden brown on both sides.
  8. Repeat till all the batter is done.

Serve hot with chutney of your choice.

Tuesday, December 24, 2013

Keerai (greens) Thandu (stem) Kootu


There are so many varieties of keerais or greens available in India - especially in southern India - mulai keerai (type of amaranth), siru keerai (another type of amaranth), ponanganni keeri (dwarf copper leaf), pasala keerai (spinach), vendhiya keerai (fenugreek), murungai keeri (drumstick leaves), manathakali keerai, vallarai keerai (pennywort) – to name a few.  My mom would either buy these at a wholesale vegetable market where farmers send fresh produce, or from the vendor who would bring these to the door.  She would make these in different ways – keerai masial, keerai kootu, more kootu, keerai vadai, keerai kuzhambu etc. 


Keerai Thandu Kootu

We had a drumstick tree in our backyard – so we got murungai keerai from that.  My mom would add this to adais.  We also had a manathakalikai (European black nightshade) bush, and got the purple berries and greens from this plant.

Once I moved here, the only recognizable keerai I had access to was palak  - spinach.  Chopped spinach was available in the frozen vegetable section in the regular grocery store and that was the only keerai I made for the longest time.

A couple of summers ago, we became members of a local CSA (Community Supported Agriculture).  Due to weird summer weather that year, most of the harvest was greens – arugula, kale, chard, mustard greens, spinach, and numerous others I don’t know the names of.  So I started experimenting with these – some hits and some misses.


Of late, the big Asian market near my house, has been carrying amaranth (a variety of mulai keerai) and pennywort (brahmi/vallarai).  I buy these and make it the same way that I make spinach.  The last time I got Amaranth, I noticed that the stems were really thick, and remembered this kootu (vegetables cooked with moong dal and spices) my mom used to make with keerai thandu (stems) and decided to make it.

The amaranth I get here has red and green leaves (red around the veins and green on the edges) – like this one in the picture.

I trimmed the leaves and used it to make saag, and chopped the stems to make this kootu


Here is what you need:


  • ½ cup toor dal
  • ½ cup moong dal
  • 12 – 15 thick amaranth stems
  • 2 tsp. dhania (coriander seeds)
  • 2 tsp. jeera (cumin seeds)
  • 2 tsp. urad dal
  • 3 red chilies
  • 1 tsp. black pepper
  • ¼ tsp. hing
  • ¼ cup grated coconut
  • ¼ tsp. turmeric powder
  • salt to taste
For tempering:
  • 2 tsp. oil
  • ½ tsp. mustard seeds
  • ½ tsp. jeera
  • ½ tsp. urad dal
  • 2 red chilies
  • few curry leaves

Here is how I made it:


  1. Wash and rinse the dals, add water and cook in a pressure cooker till done.
  2. Wash the amaranth stems and dice them.  Place them in a pot with water, bring to boil and cook on medium-low heat till done (about 7 – 8 minutes).  Drain the water and set aside.
  3. While the stems are cooking, dry roast dhania, jeera, urad dal, red chilies, black pepper, and hing.  Let this cool a bit and grind to a coarse paste with coconut.
  4. Now, add the mashed dal to the cooked stems.  Add a little water and salt to taste along with turmeric powder.  Bring this to a boil.
  5. Add the ground paste and simmer for a few more minutes.
  6. Heat oil for tempering in a small pan.  Add mustard seeds, jeera, urad dal, and red chilies. 
  7. When the mustard seeds sputter, turn off the stove, add the curry leaves (carefully, because it tends to splash oil), and pour this over the kootu.
Serve with rice, rasam, kuzhambu or sambar.


Sunday, December 15, 2013

Yellow peas curry

I had these grand plans of making katori (small bowl) chaat for my navrathri party.  Since there were around 60 – 70 people coming, I did not want to spend long hours in front of the stove deep-frying the katoris.  I had seen some blogs where people had baked wonton wrappers to make katoris and decided to try it out.  It was a disaster for me.  I don’t know if I was doing something wrong or not, but when baked and cooled, my katoris became very hard and difficult to eat.


Vatana-Curry
Yellow Peas Curry


By this time though, I had already soaked and boiled the yellow peas to make the filling, and so was stuck with about three pounds of boiled yellow peas.  I froze most of it and have been making a small dent into this slowly.

It does come in handy though, on those days when I am really tired, after a long day at work and driving to and from soccer practice or meetings at school.  I just make a quick masala, add some thawed peas, and serve it with rice or rotis.


Yellow Peas Curry

Here is what you need:


  • 1 cup dried yellow peas
  • salt to taste
  • ¼ tsp. turmeric powder
  • ¼ tsp. hing (asafetida)
  • 2 tsp. oil
  • 1 tsp. jeera (cumin seeds)
  • 2 – 3 green chilies, slit
  • ½ medium onion, chopped
  • 1” piece ginger, slivered
  • 4 cloves garlic, sliced
  • 1 regular or two roma tomatoes, chopped
  • 1 tsp. dhania powder
  • 1 tsp. jeera powder
  • 1 tsp. chili powder
  • ½ tsp. amchur powder
  • 1 tsp. freshly roasted and powdered jeera
  • cilantro, sliced onions, and green chilies for garnish


Here is how I made it:


  1. Wash and soak the yellow peas for 4 – 5 hours.
  2. Put the yellow peas, salt, turmeric, and hing with enough water in a pressure cooker.  Cover and cook for 10 minutes on low heat after the first whistle/sound.
  3. In a pan, heat oil. Add jeera.
  4. When the jeera changes color, add the green chilies and let them sear.
  5. Add the onions, ginger, and garlic.
  6. Sautee on medium heat till they look well blended and start changing color.
  7. Add tomatoes.  Cover and cook for a few minutes till the tomatoes are mushy and have lost their shape
  8. Now add all the dry spices and fry for a few minutes, being careful not to let the spices burn.
  9. Add the cooked peas.  Add more water and salt if necessary. Let this simmer for fifteen minutes.  Turn off the stove.
  10. Sprinkle freshly ground cumin powder and cilantro on top.
  11. Just before serving, top with chopped onions and green chilies.


Serve with rotis and rice.


Thursday, December 12, 2013

Batata Poha (Beaten rice with potatoes)

This recipe is in memory of my sister-in-law.

My older brother got married when he was very young – around 22 – 23.  I was about 12 – 13 when my sister-in-law came to live with us.  Having lived in a male dominated household, it was great to have another female in the house! 

As a new bride, she would make a few “modern” or different dishes for us.  My mom would do most of the daily cooking, but occasionally, when we were in the mood for something different, my sister-in-law would take over the kitchen.


Batata Poha

One of the dished she made for us was called “padada puv-ha”.  This was what she called it.  It was made with aval – or poha (beaten rice), and potatoes.  I always thought of it as a fancy aval upma. 

Only after I got married, came to the U.S., and made a few Marati friends, did I realize that my sister-in-law had actually been making Batata Poha.  I think she probably got the recipe from a Tamil magazine.  In Tamil, we use the same alphabet to represent the “pa” sound and the “ba” sound.  Similarly we have one alphabet for the “ta” and “da” sounds.  So batata poha ended up becoming padada puv-ha.


She passed away a long time ago – a couple of months after my nephew was born.  He is now 29 years old and has a family of his own.  But every time I make poha at home, I remember her and the awe with which I used to watch her whip up this “gourmet” dish.

Here is what you need:

(To serve two people)

  • 1 cup poha (beaten rice)
  • 2 tsp. oil
  • ½ tsp. mustard seeds
  • ½ tsp. jeera (cumin seeds)
  • few roasted peanuts (I used about ¼ cup)
  • few curry leaves
  • 2 green chilies, slit
  • ½ medium onion, chopped
  • salt to taste
  • ¼ tsp. turmeric powder
  • ¼ tsp. sugar (optional)
  • 1 medium potato, peeled and diced
  • cilantro for garnish
  • juice of ½ medium sized lime or lemon
  • little bit of grated coconut


Here is how I made it:


  1. Wash and soak the poha (beaten rice) with enough water for about 5 – 6 minutes.  Drain the water ands et this aside.
  2. Heat oil in a kadai or pan.  Add mustard seeds and jeera.
  3. When the mustard seeds sputter, add the peanuts, curry leaves and green chilies.  Fry for about 30 seconds.
  4. Add chopped onions and mix well.  Sauté on medium heat for about 5 minutes, till the onion turns translucent.
  5. Add salt, sugar, and turmeric powder.  Stir.
  6. Now add the diced potatoes.  Cover and cook on low heat till the potatoes are cooked.  You can also use boiled, peeled and diced potatoes here, instead of raw potatoes.
  7. Add the poha and mix well.  Let it cook for a few more minutes, so that the poha absorbs all the flavors.  Turn off the heat.
  8. Garnish with cilantro, lime juice and coconut.


Enjoy with namkeen and pickles.


Wednesday, December 4, 2013

Traditional Paruppu Usili with Kothavarangai (Cluster beans and dal curry)


You know the phrase “finger-lickin’ good”?  I think it applies perfectly to South Indian food.  My cuisine tastes best when eaten with your hand – so that at the end of your meal you can actually lick your fingers to show your appreciation of the meal.

I cannot understand how people who grew up eating with their hands, now eat rasam sadam, sambar sadam, or morkuzhambu with a spoon.  Where is the pleasure in that?  The best part of the whole experience is in slurping up the rasam before it drips down your palm towards your elbow :)


Sadly, my kids have not been exposed to this pleasure.  When they were young, I used to feed them rasam sadam (rasam rice), and by the time they were old enough to eat on their own, they felt eating with their hand messed it up too much.  They still use silverware to eat rasam rice or yogurt rice.  A couple of times, when we have been to weddings or other functions in India, they have been served a traditional meal on banana leaves – it was comical to watch them try and win the battle.

Most wedding or special function menus include payasam (kheer), sambar, rasam, morkuzhambu, couple of vegetables – one of which is typically paruppu usili, kootu or avial, thair pacchidi (raita), vadai, appalam, pickle,  kosumalli (salad), and some other sweet.  If there is morkuzhabu on the menu, you can almost guarantee that there will be paruppu usili to go with it.


Since I was making the traditional morkuzhambu for my husband, and had time, I decided to make paruppu usili too.  My Indian store gets veggies on Thursdays.  So I got vendaikkai (bhindi/okra) for the morkuzhambu and kothavarangai (cluster beans) for the paruppu usili.

I had posted a recipe earlier for paruppu usili using moongwadis.  This time, I made it the traditional way – soaking dal, grinding it, steaming it, and then making the dish.  It takes a little more time, but the taste in the end is totally worth it.


Here is what you need:


  • 1 cup toor dal, washed and soaked for about an hour
  • 4 – 6 red chilies
  • ¼ tsp. hing (asafetida)
  • salt to taste
  • 2 cups cluster beans, washed, trimmed, and chopped
  • 3 tsp. oil
  • 1 tsp. mustard seeds
  • 1 red chili, broken
  • few curry leaves


Here is how I made it:


  1. Drain the water from the toor dal.  Grind it to a coarse paste with red chilies, hing, and salt, adding very little water.
  2. Distribute the ground paste onto idli plates or a steamer, and steam for about 7 – 8 minutes.  Alternatively, you can steam this in the microwave in a bowl, stirring occasionally, till the paste is crumbly.
  3. While this paste is steaming, place the cluster beans in a microwave safe bowl with enough salted water to cover the beans.  Microwave on high for about 8 minutes till the beans are cooked.  Drain and set aside.
  4. When the steamed paste has cooled a bit, crumble well with your hand, so that there are no big lumps.
  5. Heat oil in a pan.  Add mustard seeds and red chilies.
  6. When the mustard seeds sputter, ad the curry leaves.
  7. Add the dal paste and stir well.  Let this mixture cook on medium-low heat for a few minutes.
  8. When the dal looks dry and starts getting slightly crispy, add the cooked beans.
  9. Cover and cook for 5 minutes, adding salt if necessary.


Serve hot with morkuzhambu, rice, and rasam.

Vendakai Morkuzhambu (Buttermilk stew with okra)

This is the kind of morkuzhambu that my mom usually makes.  It is also the kind that is served as part of the feast in Tamil weddings and in restaurants when you order South Indian Thalis (meal plates with assorted delicacies from a particular region).  She did not make it as regularly as sambar or rasam.  We would have it on special occasions, as part of a big meal.  She typically made it with paruppu usili or seppankizhangu curry.


Buttermilk-stew-with-okra


Since I learned to make red morkuzhabu from my mother-in-law, I have been leaning towards that and have ignored this more traditional kind.  Last weekend, my husband was mentioning that it has been a while since we had this morkuzhambu.  In fact, he said, he was going to make it one of these days.  I didn't think that was going to happen any time soon.  He is a good cook and does cook occasionally – like on Mother’s day, and maybe my birthday, and a couple of times in between.

To be fair, I really shouldn’t blame him.  I consider the kitchen my "petai" or domain.  I don’t like sharing my kitchen space and also hate people messing up my arrangement of spices and utensils.  My friends, mom, mother-in-law, and my husband have all experienced this reluctance (that is putting it mildly) on my part to share my kitchen.


Anyway, since I had the day off, and it was the day my Indian store got fresh vegetables (I made this with fresh okra or vendakai), I decided to make the morkuzhambu myself.  I also made rasam, keerai, and paruppu usili.  My husband was a happy man at dinner :)

Here is what you need:

  • 3 tsp. toor dal
  • 1 ½ tsp. channa dal
  • 2 tsp. jeera
  • 2 tsp. dhania
  • 5 green chilies
  • 1” piece ginger
  • ¼ cup grated coconut
  • 2 cups sour yogurt
  • salt to taste
  • ¼ tsp. turmeric
  • 1 tsp. oil
  • 6 okras
For tempering:
  • 1 tsp. oil
  • ½ tsp. mustard seeds
  • 2 red chilies
  • ¼ tsp. hing
  • few curry leaves


 Here is how I made it:

  1. Soak the toor dal and channa dal in water for about an hour.
  2. Drain the water from the dals and grind them along with jeera, dhania, green chilies, ginger, and coconut, into a smooth paste.
  3. Mix this with beaten yogurt, salt, and turmeric powder in a pot.
  4. Place this on low heat, stirring constantly to prevent curdling.  When it shows signs of coming to a boil, turn off the heat.
  5. Cut off the top and tail of the okras and slice them.
  6. Heat 1 tsp. oil in a saucepan.  When the oil is hot, add the okra and cook on high heat, till the okra turns golden brown. 
  7. Reduce heat and cover and cook for 5 minutes so that the okra is cooked through.
  8. Add this to the kuzhambu. 
  9. Heat the rest of the oil and add the mustard seeds, red chilies, and hing.
  10. When the mustard seeds sputter, add the curry leaves.
  11. Turn off the heat and pour this over the kuzhmabu.


Serve hot with rice and paruppu usili or seppankizhangu curry


Saturday, November 30, 2013

Milagu Kuzhambu (Pepper Kuzhambu)


I have this brown diary from 1985, filled with hand-written recipes.  This was the diary my mother-in-law sent with my husband, when he came to the U.S. as a graduate student.  In it, she has penned down recipes for different rasams, couple of types of sambar, lemon rice, curd rice, a simple vegetable kootu, adai, pongal, her signature morkuzhambu, and a recipe for milagu kuzhambu.  For each dish, she has listed ingredients and easy-to-follow steps, and shortcuts for my husband.


Pepper-kuzhambu


I love her simple explanation for preparing these dishes and even today, turn to it for some classic recipes.  I got this recipe for milagu kuzhambu from her.  Most milagu kuzhambus I have had are fairly thick in consistency (almost like a chutney or thogayal).  My mother-in-law made it similar to the consistency of vathal kuzhambu. She has made this a few times when she stayed with us.  I love the tangy taste from the tamarind and the spicy kick from the pepper.

It tastes great with sutta appalam (fire-roasted papad).

Here is what you need:


For the masala powder:
  • 2 tsp. dhania
  • 3 red chilies
  • 3 tsp. pepper
  • ¼ tsp. hing
  • 3 tsp. channa  dal
  • 1 tsp. urad dal
To make the kuzhambu
  • small lime-sized ball of tamarind
  • 2 tsp. sesame oil
  • ½ tsp. mustard seeds
  • 2 red chilies
  • few curry leaves
  • salt to taste

 Here is how I made it:

  1. Dry roast all the ingredients for the masala powder.  Let it cool
  2. Grind it to a fine powder. Set aside.
  3. Soak the tamarind in a cup or so of warm water and squeeze out the juices, adding more water if necessary.  I had about 2 cups of tamarind water.  Discard the remaining pulp.
  4. Heat oil for tempering in a kadai.  Add mustard seeds and the red chilies. when the mustard seeds sputter, add curry leaves.
  5. Carefully pour the tamarind water into this pot, add salt and bring it to a boil. 
  6. Let it simmer on medium heat till the raw smell goes from the tamarind.
  7. Mix the powdered spices with a little water and add that to the tamarind water.
  8. Simmer for a few more minutes (about 5 – 10), till the oil floats on top and the gravy thickens.


Serve with hot rice drizzled with sesame oil, parupputhogayal, urilaikizhangu curry, and sutta appalam.


Wednesday, November 27, 2013

Karasev with garlic


It is now almost a month since Deepavali.  All the snacks I made, and the ones my friends shared with us are done.  My husband still comes back home and opens the pantry door, looking for some forgotten dubba (box) of snacks in the back.


Anyway, I had the day off after a long time.  It had snowed over night and the roads were pretty slick. I did not feel like going out to run errands, so decided to make something for my husband to munch on when he came home - and in the process have a handful myself :)

On our last trip to India, my brother kept bugging my mom to get him some garlic -flavored karasev.  She either forgot to buy it, or couldn’t find it in the store, and she ended up making some for him.  He loved those so much, that she had to make another batch and send it over to Singapore.


I have made karasev before, but have never added garlic to them and decided to try it out.  They came out great!  My husband came home, and as usual, looked in the pantry and saw these.  He munched on a few  and loved them.

Only later, when he saw the thenkuzhal press on my draining board, did he realize that I had made these - he though I had bought them!
Note:  Typically, karasev is made with a special ladle.  I don’t have this, so I used one of my thenkuzhal discs to make these.


Here is what you need:

  • 2 ½ cups besan (gram flour)
  • 1 cup rice flour
  • 2 tsp coarsely crushed pepper (I used my pepper grinder and just approximated the measurement)
  • ½ - ¾ tsp. red chili powder
  • ¼ tsp. hing (asafetida)
  • salt to taste
  • 3 tsp. ghee
  • 1½ tsp. minced garlic (I used store bought)
  • water to make the dough
  • oil for deep frying


Here is how I made it:

  1. Heat the oil for deep frying in a big kadai or deep pan.
  2. In a bowl, combine besan, rice flour, pepper, chili powder, hing, and salt.  Mix well.
  3. Add the ghee and garlic.  Slowly add water to make the dough.  Don’t make this too stiff because it will be difficult to press out the dough.  It needs to be a bit sticky to the touch.
  4. Make a big ball of dough and put it into the thenkuzhal press with the appropriate fitting.
  5. While swirling, squeeze out enough of the dough into the hot oil.  Reduce heat to medium and cook till both sides are done.  Drain on paper towel.
  6. Repeat till all the dough is done.
  7. Once the karasev is cool, break it up into pieces and store it in an airtight container.

Tuesday, November 26, 2013

Kathirikkai Curry (Eggplant / Baingan Curry)

I think I have said this before – kathirikkai (eggplant) is one of my favorite vegetables.  I think it is more of a favorite because we did not make it too often.  While growing up, both my brothers did not like it, and now, my kids don’t like it, and my husband barely tolerates it.  So my mom did not make it often, and I don’t either.


baingan-eggplant-curry


Most people don’t like eggplant, more because of the texture than because of the taste (at least that is my theory).  When I make these I home, I cook them in such a way that they don’t lose their shape and get mushy.  This is the only way my husband will eat it.  But he does like baingan bartha though – go figure!

My kathirikkai buddy is my friend Hema, who loves it as much as I do, and I think of her every time I make these.  She and I are the only ones who would look forward to lunch when we know that there is eggplant involved.  Miss you Hema – need to get together soon!


Here is what you need:

(serves a family of 4, with two who don’t eat this, and one who eats it reluctantly :) )

  • 2 tsp. coriander seeds
  • 2 tsp. channa dal
  • 1 tsp. urad dal
  • 1 tsp. black pepper
  • 1 tsp. cumin seeds
  • 3 red chilies
  • 2 tsp. oil
  • 1 tsp. mustard seeds
  • 1 tsp. channa dal
  • ½ medium onion, chopped
  • 2 long japanese eggplants, washed and diced (after you cut off the stem)
  • salt to taste
  • ¼ tsp. turmeric powder
  • ½ tsp. chili powder  


Here is how I made it:


  1. Dry roast the first six ingredients (coriander seeds, channa dal, urad dal, black pepper, cumin seeds and red chilies).
  2. Cool and grind this to a coarse powder.
  3. Heat oil in a pan. Add mustard seeds and channa dal
  4. When the mustard seeds sputter add the chopped onions.
  5. Saute for a few minutes till the onions turn translucent.
  6. Add the eggplant, salt, turmeric, and chili powder.  Mix well.
  7. Cook covered for five minutes.
  8. Remove cover and cook on low for 10 more minutes, tossing the pan a couple of times.  I try not to use a spatula so that I don’t mush up the eggplant.
  9. Add the ground masala and give it a toss to coat all the eggplant.
  10. Fry for a few more minutes so that the eggplant absorbs all the flavors.


Serve with rice, sambar, rasam, vathal kuzhambu, or with rotis.

Saturday, November 23, 2013

Paneer Wrap


Recently, I saw these Roti Wraps in the frozen food aisle in my Indian store and decided to try them out.  On our trip to Kolkata, we feasted on Kati Rolls and these seemed like the ideal covering for something like that. They look like thinner versions of laccha paratas and are the right size to make wraps.

Both my kids are big fans of paneer.  I don’t like paneer at all, and my husband doesn’t eat it either.  So, with my oldest away at college, it is difficult to use up the block of paneer that I get from my Indian store, before it gets spoiled.  I try to find different ways to use it so that my younger son ends up having a variety of dishes using his favorite ingredient, and we don’t end up with a ton of leftovers.


Paneer Wrap


The Roti Wraps gave me the idea to make paneer wraps.  The minute I say "paneer wrap" my younger son’s eyes light up.  It is now one of his favorite things to have for dinner or weekend lunch (after Italian or Mexican).  I wish he would take these to school though. 

His standard lunch on school days is bagel with cream cheese, a green apple, a belVita bar, and some Cheez-its.  He will not take anything that requires warming up, or something that needs silverware.  He claims that he has to be able to walk/run around with his food, because sitting down to eat is SO not done.

Paneer Wrap

A couple of weeks ago, I was trying out different lunch options for him.  This was more because I was getting bored packing the same thing everyday, than him complaining about it.  While potato sandwiches and veggie burger passed muster, the paneer wrap failed.  He felt that these wouldn’t taste as good when they are cold, and I tend to agree with him.  It tastes great hot off the tawa though.

Here is what you need:

(to make 4 wraps)

  • 2 tsp oil
  • ½ tsp jeera (cumin seeds)
  • ½ large onion, thinly sliced
  • 2 green chilies, slit
  • ½ tsp. chili powder
  • ¼ tsp. turmeric
  • 1 tsp. cumin powder
  • 1 tsp. coriander powder
  • ¼ green bell pepper, thinly sliced
  • ¼ red bell pepper, thinly sliced
  • ¼ yellow bell pepper, thinly sliced
  • ½  block of paneer , cut into strips
  • salt to taste
  • cilantro for garnish
  • 4 roti wraps. plain rotis or tortillas
  • some oil to make the wraps crispy


Here is how I made it:


For the filling:

  1. Heat oil in a sauce pan.  Add cumin seeds
  2. When the seeds change color, add the onions and green chilies.  Sauté for a few minutes.
  3. Add the chili powder, turmeric, cumin powder,  and coriander powder.  Mix well.
  4. Add the peppers and salt. Sauté for five minutes.
  5. Now add the paneer.  Toss to blend well.  Cook on low heat for about 5 minutes so that the paneer absorbs all the flavors.
  6. Garnish with cilantro.

To make the wraps:

  1. Thaw the roti warps (if you are using them).
  2. Place a few spoonfuls of the filling in the center of the wrap/tortilla.
  3. Fold one side in a little and roll like you are making a burrito.  Poke a toothpick into the wrap to keep it from unraveling.
  4. Heat a tawa or a sauce pan.  Drizzle it with a little oil.
  5. Place the wraps on the hot tawa and let them get crispy on one side.  Flip them over and let them get crispy on the other side too.

Serve hot with chutney, ketchup, or just like that.


Wednesday, November 20, 2013

Medhu Vadai (Urad Dal Vadas)


We have a tradition.  Every time we go to Chennai, the morning after we land, my mom makes idli or dosa for breakfast, and we get medhu vadais from the Udipi restaurant a couple of doors away from our apartment complex. 

Urad-Dal_Vada
Medhu Vadai (Urad Dal Vadas)


This is a small restaurant, bustling with customers at 6:30 a.m.  There is a pot in the corner, with steaming milk, ready to be mixed with decoction for filter coffee, mounds of hot vadais and steaming idlis, a big stainless steel bucket with pongal – dripping with ghee, buckets of sambar, coconut chutney, onion-tomato chutney, and masala for dosas, all visible behind the counter.  The waiters have banana leaves, newspaper, and twine – ready to wrap up any order for parcel (take-out) that comes their way.  My husband likes pongal from here too – so sometimes I get pongal and vadai for him.   But, there is nothing that comes close to idli, vadai, sambar, and chutney for breakfast – at least not for me.


Though I don’t make these vadais for breakfast here, I make them for a lot of festivals and parties.  These are really simple to make – the most basic recipe has only four ingredients.  The trick is to be able to grind the batter without using too much water.  A lot of people add more water than necessary and so end up with oily vadais.  Since I use a wet grinder to make the batter, I use very less water.  My batter ends up being really thick, and my vadais come out really crispy on the outside and soft on the inside.  As you can see, they are not oily at all.  See note below, if you don't have a grinder.

Here is what you need:

(to make about 20 - 24 vadais)

  • 2 cups whole urad dal without skin
  • salt to taste
  • 2 tsp. jeera
  • 2 tsp. whole black pepper
  • oil for deep frying
Optional: curry leaves, chopped green chilies, minced ginger, chopped onions


Here is how I made it:


  1. Wash and soak the urad dal for a couple of hours.
  2. Grind to a smooth paste without adding too much water.  I probably add less than a quarter cup of water to make the batter.
  3. Heat oil for deep-frying.  Once the oil is hot, reduce heat to medium so that the vadais cook evenly.
  4. Add the salt, jeera, and pepper to the batter.  If you are using any of the optional items, add those too.  Mix well.
  5. Keep a bowl of water next to you. 
  6. I use a sandwich- size ziploc bag to shape the vadais. Wet your hand as well as the ziploc bag.
  7. Take some batter (about the size of a big lime) in you hand and put it on the Ziploc bag. 
  8. Shape it like a donut with a hole in the middle.
  9. Drop this gently into the hot oil.  You can fry a few vadais at a time.  Turn the vadais over gently a couple of times till they turn golden brown.
  10. Drain them on some paper towels.
  11. Repeat till all the batter is done.


Serve hot with chutney or sambar and idlis, or as part of a meal.

Note:  If you don't have a grinder, and need to use a blender to make the batter, you will need to use a little more water.  In that case, add a little semolina to the batter, after you grind it, to make the vadais.

Sunday, November 17, 2013

Soft Idlis


A lot of people who grow up in southern India take idlis for granted.  I probably did too, but I loved them – especially idlis that have been coated with molagai podi.  My mom used to pack these for lunch and my friends and I would devour them way before lunch time.

It was only when I moved to the U.S., that I appreciated the soft idlis that I used to eat back home.  With only an Oster blender in my kitchen, it was really difficult to get the perfect idli batter.  Also Colorado winters are really cold and getting the batter to ferment was a big deal.  I used to try warming up the oven before putting the batter in, leaving the oven light on, and even wrapping the container with the batter in a shawl to keep it warm.  Who knew that getting the perfect idli batter would be so difficult?


idlies


Once we moved into a house, one of my first purchases was a wet grinder.  I still did not have too much space, so bought the smallest Ultra available online, and have been using it ever since.  Apart from making soft idlis, I have also been able to make almost perfect medhu vadas since I bought the grinder.

There are as many idli batter recipes as there are South Indian households.  I know people who use a 3:1 ratio, 2:1 ratio, 5:1 ratio and various other options in between for their rice to urad dal proportion.  I have a friend who will steam the raw rice (without water) to make it into pseudo-parboiled rice before soaking it for the batter.  I know people who add beaten rice or even cooked rice to the batter to make soft idlis.  

Some things to remember - the dal needs to be really smooth and fluffy after grinding.  Also, the amount of water - or the consistency of the batter is important, if it is too watery, the idlis might be flat and if it is too thick, you may end up with hard idlis.  Mix the batter well after fermenting, before making the idlis.

Here is my recipe.


Here is what you need:

 (makes about 40 idlis)
  • 2 cups raw rice (I use Sona Masoori - but any regular rice should do)
  • 2 cups idli rice
  • 1 cup whole urad dal, without skin
  • 1 tsp. methi seeds
  • salt to taste

Here is how I made it:

  1. Wash the two types of rice together in several changes of water.
  2. Wash the dal and methi seeds also in several changes of water.
  3. Soak them separately for at least 4 hours.
  4. I use my Ultra Pride wet grinder to make my batter.  Add a little bit of water (about 1 cup) to the grinder and start it.  Add the urad dal with methi seeds.  Grind it to a smooth, fluffy paste.  You may need to add more water if the batter is getting too thick.
  5. You will also need to keep scraping the batter from the sides of the grinder, to make sure that it is all uniformly smooth and fluffy. It takes about 20 minutes for my dal to grind well.
  6. Remove the urad dal paste into a big bowl.
  7. Now add more water (another cup) to the grinder and add the rice to it.  The rice gets done much faster than the dal (probably 10 - 12 minutes).  When you have a mixture that is not totally smooth, but is not coarse either, stop the grinder.
  8. Remove this and add it to the urad dal batter.
  9. Add a tiny bit of water to the grinder to clean the sides and pour this also into the bowl.
  10. Add salt to the batter and mix it well with your hand.  My mom says that the heat from your hand starts the fermentation process.
  11. Cover the batter and leave it in a warm place overnight.  I leave it in my oven (no heat or light).
  12. Your idli batter will be nice and bubbly and ready for you in the morning.


To make idlis:

  1. Mix the batter thoroughly.
  2. Grease idli molds with either nonstick spray or oil.
  3. Spoon a small ladleful of batter into each mold (so that the mold is 3/4 full).
  4. Add a little bit of water to the bottom of a pressure cooker or steamer.  Place the idli molds in the cooker/steamer and steam for about 15 minutes without the pressure building (with the weight off or in the steam release position).
  5. Remove the lid and let the idlis rest for about 5 minutes.  Remove them from the mold with a wet spatula or spoon.

Serve steaming hot with chutney, molaga podi, or sambar.

Note:  If you are making this for a large party, place a wet cloth or paper towel on the bottom of the serving  bowl, place the idlis in it, and cover them also with a moist paper towel, so that they don't dry out.  When you are ready to serve, warm it up in the microwave, covered with a moist towel.

Related Posts Plugin for WordPress, Blogger...