Thursday, October 31, 2013

Sprouts Pulao


We have been eating traditional south Indian food for a few days in a row.  Just over the last few days I made adai, milagu kuzhambu, jeera rasam, paruppu thogayal, amaranth keerai, potato curry, and upma to name a few.


Even though my husband never gets tired of this fare, I was ready for a change.  I also wanted to make just one thing for dinner  (something my younger son also will eat).  After a really long day at work, I did not want to stay in front of the stove for too long.   I also did not want to add more food to the stash of leftovers in the fridge.

While browsing some of my favorite food blogs, I came across this recipe for Garlicky Herbed Lentil and Carrot Pilaf.  It seemed really simple to make and looked like a one-pot meal.


I had sprouted some masoor dal for another recipe and had frozen the unused sprouts.  This is something I do often.  If I plan in advance to make something using sprouts, then I make a little extra and freeze it, so that I can add it to pulaos or other dals.  This saves me a lot of time and not only adds a wonderful texture to whatever I am making, but also increases its protein content.

I mostly followed the recipe above, with some very minor modifications.  


Here is what you need:

(for a family of 4)

  • 1 ½ cups basmati rice
  • 2 tsp. ghee
  • 1 tsp. jeera (cumin seeds)
  • ½ tsp. saunf (fennel seeds)
  • 3 – 4 cloves
  • ½ tsp. kalonji (onion seeds/nigella)
  • 1 tsp. oil
  • 3 cloves garlic
  • 2 jalapenos
  • 1” piece ginger
  • some cilantro, finely chopped
  • 1 small carrot, thinly sliced
  • 1 cup sprouted masoor or sprouted moong dal
  • salt to taste


Here is how I made it:


  1. Wash and rinse the basmati rice in several changes of water.
  2. Heat ghee in a pan.  Add jeera, saunf, cloves, and kalonji.
  3. When the jeera changes color, add the basmati rice and a little bit of salt.  Fry for a few minutes.
  4. Add three cups of water.  Bring this to a boil, reduce heat to low and cook, covered, till the rice is done (about 10 – 12 minutes)
  5. While the rice is cooking, take the garlic, ginger, and jalapenos in a food chopper or your cutting board.  Mince them to a coarse mixture.
  6. In another pan, heat the oil.
  7. Add the garlic mixture and cilantro.   Sauté for a few minutes.
  8. Add the sliced carrots and sprouted masoor dal.  Add a little bit of salt to taste (remember that the rice already has salt added to it) and mix well.
  9. Cook covered, on low heat, till the masoor dal is done – about 10 – 12 minutes.
  10. Now, add this mixture to the cooked rice and mix well.
  11. Cover this and cook for about five more minutes so that the rice absorbs all the flavors.


Serve hot with a simple dal and raitha.


Monday, October 28, 2013

Thatai

I am gearing up for Deepavali by making some goodies.  My mom used to do this every year.  The weekend before the festival, she would soak the rice, strain it out, dry it on a mat, and send it along with various dals to the flour mill to be ground into powder for the different “bakshanams” that she was going to make for the festival. 

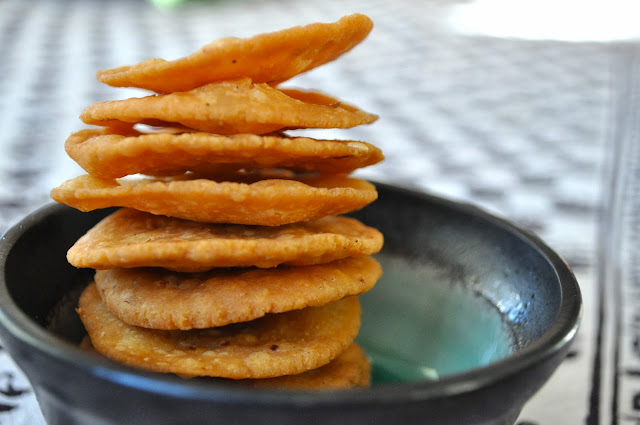
Stack of Thatais

If my grandmother was around, she would make kai murukku (murukku that you make by hand – without a press).  Otherwise, my mom would make mullu thenkuzhal, ribbon pakoda, thatai, mixture, and some sweets.

My dad worked in a bank all his life.  So a lot of people will come to see him during the holidays and most of them will come with a box of sweets.  So my mom did not make much.  Just one for sastaram – for tradition.  Also, nobody ate sweets that much in our house, so most of those will just get redistributed.

I have tried to carry on this tradition in my house.  I make a few salty snacks and make one or two sweets. I made ribbon pakoda and thatais over the weekend.

My mom’s thatais were the best.  These take a little more time to make than thenkuzhal, ribbon pakoda, or mullu murukku because you have to press each thatai separately.

Here is what you need:


  • 4 cups rice flour
  • 1 cup urad flour
  • ¼ cup channa dal, soaked for about an hour
  • 3 tsp. sesame seeds, toasted
  • ½ - ¾ cup grated coconut
  • 1 tsp. hing (asafetida)
  • 2 tsp. chili powder
  • salt to taste
  • 3 Tbsp. butter, melted
  • 1 Tbsp. hot oil
  • oil for deep-frying

Here is how I made it:


  1. Heat oil for deep-frying in a heavy-bottomed pan, on medium heat
  2. Mix the rice flour, urad flour, soaked channa dal (drained), sesame seeds, coconut, hing, chili powder, and salt.
  3. Add the melted butter and hot oil (you can add some from the oil you are heating for frying the thatais)
  4. Add water little bit at a time and knead everything to form a stiff dough. Taste the dough to make sure that it has enough salt.
  5. Take a little bit of the dough at a time and make small balls (about the size of a gooseberry).  Keep the rest of the dough covered.
  6. Place about 5 – 6 of these on a plastic sheet or a gallon-sized Ziploc bag.
  7. Place another Ziploc bag on top of the balls and press down with the back of a katori to flatten the balls.
  8. Prick each thatai with a toothpick, and gently drop them into the hot oil.
  9. Fry till both sides are evenly cooked and the thatais are golden brown
  10. Remove and drain on paper towels.
  11. Repeat until all the dough is done.


Store in an airtight container when they have cooled down

Note:  Some people add powdered fried gram dal (pottu kadalai) to the batter.  You can also add curry leaves or garlic to get different flavors.


Sunday, October 27, 2013

Ribbon Pakoda


My husband left to come back to the U.S., four days after our wedding.  I only joined him a couple of months later.  While I was waiting for the paperwork to come so that I could apply for my visa, I spent some time with my in-laws.  They were the sweetest, most gentle people ever.  I mostly stayed in my parents’ house and would go once every couple of days to spend some time with my mother-in-law.


Ribbon Pakoda


She loved to feed people.  You could not go to her house and leave without eating something. This was something that truly brought her joy.  She relished serving all the delicious food she made to the family and friends who visited her.  And everyone knew that if you visited Saroja perima/atthai, you would leave with a full, sated belly.

Once, when I had gone to see her, she asked me “tape sapidariya?”, meaning “would you like to eat some tape?”.  I was stumped.  Did I hear her wrong?  What was this tape? And why did she want me to eat it?


Turned out, she was referring to ribbon pakoda,.  I had never heard it called that in my twenty-four years of living in Chennai.  But, I realized later, that all the people in my husband’s family called it tape.

This is a really simple snack to make and hard to mess up. 


Here is what you need:


  • 3 cups rice flour
  • 1 cup besan (gram flour)
  • salt to taste
  • ½ tsp. hing (asafetida)
  • 2 tsp. red chili powder
  • 3 Tbsp.  softened butter
  •  1 Tbsp. hot oil
  • oil for deep-frying

Here is how I made it:


  1. Start heating the oil for deep-frying in a wok or kadai, on medium heat.
  2. Add the rice flour, besan, salt, hing, and red chili powder to a bowl.  Mix well.
  3. Add the softened butter.
  4. Take a tablespoon of hot oil from the stove (the one you are heating up for deep-frying) and pour it over this mixture.
  5. Start kneading this mixture while adding warm water till you have a stiff dough.
  6. Take big balls of dough and place them in the press fitted with the ribbon pakoda disc.
  7. Squeeze out the pakoda in a swirling motion into the hot oil.
  8. Let this fry on medium heat for a couple of minutes.  Then carefully, flip it over.
  9. Remove from oil when both sides are golden brown and drain out the excess oil on a paper towel
  10. Repeat with rest of the dough.


Once they have cooled, store in an airtight container.


Saturday, October 26, 2013

Gulab Jamuns - almost as easy as making from a mix


We moved to our current house in 2001.  I remember the first weekend, being surrounded by boxes, with a toddler and a 6-year old running around.  The doorbell rang, and I was thinking to myself, I am really not ready for visitors!  It was my neighbor, Soni, with a plate of garam (hot) samosas and jamuns.  Soni is an excellent cook and makes everything from first principles.  Both the samosas and jamuns were so good, I couldn’t believe she had made these from scratch!  Soni works full time and would cook a lot over the weekend.  So, almost every weekend, she would send goodies our way.


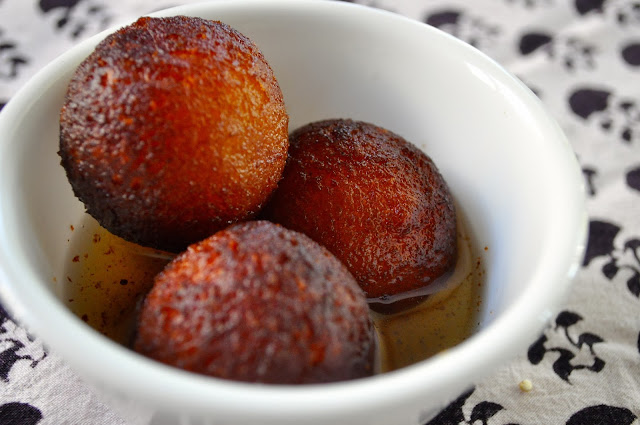
Gulab Jamun


My “almost Bengali” husband loved the jamuns she would send over, and declared that they were as authentic as the ones he got, growing up in Kolkata.  I got the recipe from her and have now made them countless times.  Though they don’t come as close to perfect as she makes them, they come pretty close.

The best part of Soni’s recipe is that it is almost as easy to make as the ones from a mix.  They taste way better than that and the tiny bit of extra effort (actually, just shopping for the ingredients) is totally worth it.

Thanks Soni, for this recipe!


Here is what you need:

(makes about 40 – 50 jamuns, depending on the size)

  • 3 cups milk powder (unsweetened)
  • 1 cup all purpose flour
  • little bit elaichi (cardamom), powdered in a mortar and pestle
  • 1 tsp. baking soda
  • 1/3 cup yogurt
  • 3 Tbsp. melted butter
  • 1 pint whipping cream (you won’t use all of it, but you will use a little more than ½ pint)
  • oil for deep frying
  • 4 cups sugar (see note)
  • 5 cups water


Here is how I made it:


  1. Put the milk powder, flour, powdered elaichi, and baking powder in a bowl.  Mix well.
  2. Add the yogurt and melted butter.  Add the whipping cream a little bit at a time, kneading the dough.  When you are able to make a stiff dough (like roti dough), stop adding the whipped cream.
  3. Knead it to a smooth ball.
  4. Heat oil for deep frying.  Make sure that the oil does not get smoking hot.  I heat on high and then turn the stove to medium-low.  To test the oil, drop a small bit of dough into it.  The dough should touch the bottom of the pot and slowly rise to the top.  If it stays on the bottom, the oil is not hot enough.  If it comes quickly to the top and gets browned immediately, the oil is too hot.
  5. Rub a little oil on your hands.  Take the dough, a little bit at a time and make small balls (smaller than keylimes).  These become bigger when you fry them and bigger still when you soak them in syrup (see picture).  These should be smooth without any visible cracks.  I make them in batches of 10.  Cover the remaining dough with wet paper towel so that it doesn’t dry out.
  6. Drop these in the hot oil.  Make sure the stove is on medium-low, so that the jamuns get cooked slowly, both inside and out. If the temperature is too high, the outside gets browned quickly, but the inside remains uncooked.
  7. When the jamuns have turned a rich dark brown, remove from oil and drain in a metal colander.
  8. Repeat till all the dough is done.
  9. While the jamuns are frying, in another pot, dissolve the sugar in the water.  Bring this to a boil.
  10. Reduce heat to medium and let this simmer till the syrup is a bit sticky to touch – may be about 10 – 15 minutes.
  11. Place the jamuns in a serving dish and pour the hot syrup over them.  Cover with a lid or aluminum foil and let it rest till the jamuns absorb the syrup.

Serve hot or cold.

Notes:  
  • I don’t like the jamuns to be very sweet, so my ratio of water to sugar reflects that.  If you like very sweet jamuns, make the sugar:water ratio equal – add 5 cups of sugar for 5 cups of water.
  • You can also add saffron, elaichi, or rose water to the syrup
  • If you want richer jamuns, you can fry them in ghee instead of in oil.
  • If I am making these for a party, I fry the jamuns and freeze them.  I then make the syrup on the day of the party and pour it, while it is still hot, over the thawed jamuns.  I then cover this with foil and let the jamuns soak up the syrup.


Friday, October 25, 2013

Paruppu Thogayal (Lentil Chutney)


I loved having my paternal grandmother visit us.  She would tell us all these great stories from Indian mythology and from her childhood.  The time to catch her would be when she settles down for her afternoon nap, after lunch.

She would wear only 9-yard sarees that she would wash herself.  There was a well in my house.  She would draw water from the well and wash the saree and hang it to dry on the clothesline.  It would stay there till the next morning for her to wear after her bath.  She continued this routine well into her nineties, when she could no longer lift the heavy wet sarees.  She also had great memory and would remember details about not only her grand kids but also her great grand kids.

She was also a very orthodox woman.  She was very particular about “madi” and “acharam” – meaning the person who was cooking, needed to have a shower, wear clothes that they had washed the previous night, and prepare the food without touching any one else.

Paruppu Thogayal


My mom, a working woman, could not consistently keep up with this because she had kids to get ready for school and when I was younger, had to braid my hair, cook the food for our breakfast, and lunch, pack it all up, as well as make food for my grandmother, before she left for work.  So my grandmother did not spend as much time with our family as she did with my father’s older brother.

When she did spend time with us, I remember that she would eat only one full meal a day – around 1:00 in the afternoon, after all her daily ablutions and pooja were done.  She would have "palakaram" in the evening – something like idli, dosa, adai, upma, or rotis. She would not eat onions or garlic.


Everyday, with her lunch, she had some kind of thogayal.  Thogayal is chutney that is thicker than the chutney you make for idli/dosa.  It is something that you can mix with rice and eat, and typically has some dal in it.  Of all the thogayals my mom made, paruppu thogayal was my favorite.  It is so simple to make and tastes so good.

Here is what you need:

  • 2 tsp oil
  • 1 cup toor dal
  • 6 red chilies
  • ¼ tsp. hing (asafetida)
  • salt to taste

You can add few cloves of garlic or some coconut to this too.  I did not

Here is how I made it:

  1. Heat oil in a saucepan.  When the oil is hot, add the hing, dal, and red chilies.
  2. Fry till the dal turns a beautiful, golden brown. Turn off the heat and let it cool.
  3. Grind in a blender to a coarse paste with salt.

Serve with rice, milagu kuzhambu, milagu-jeera rasam, and potato curry.  My favorite way to eat this - add thogayal and a little bit of sesame oil to steaming hot rice and mix well.  Have with potato curry and papads.


Tuesday, October 22, 2013

Milagu Jeera Rasam (Pepper-Cumin Rasam)


We have been having such rich food the past few days because of Navrathri festival. I have been hosting parties and have been going to friends’ places for parties. On top of that we have been feasting on left-overs. I was ready to give my stomach a break! 


 My mom always used to make jeera rasam on days following big festivals and it seemed like the perfect thing for settling down our tummies.  We would have “oil baths” – where we slather sesame oil on our head and body and wash it all off with shikkakai powder – our eyes burning because of the stray powder that has somehow managed to get into them!  We will then feast on poondu rasam (made with garlic), paruppu thogayal, and urilaikizhangu curry.  What a combination!  My dad did not like garlic, so she would make the jeera rasam without the garlic for him.

She would also make this for us if we had a cold/cough or were generally feeling sick.  Some people associate this with illnesses, but it tastes so good and is really simple to make that I make it about once a month.

I also typically serve this with paruppu thogayal (a chutney made with dals) and urilaikizhangu (potato) curry.

Since the rasam does not have dal, the paruppu thogayal complements this well.

Here is what you need:


  • tarmarind, the size of key lime (you can substitute 2 tsp. of readymade tamarind pulp instead)
  • salt to taste
  • few curry leaves
  • ¼ tsp. turmeric
  • ¼ tsp. hing (asafetida)
To grind to a paste:
  • ½ tsp. oil
  • 2 tsp. toor dal
  • 2 tsp. cumin seeds
  • 1 tsp. coriander seeds
  • 1 – 2 tsp. black peppercorns
  • 1 red chili
  • 1 roma tomato
  • 3 cloves garlic (optional)
  • few more curry leaves
For tempering:
  • 1 tsp. ghee
  • ½ tsp. mustard seeds
  • ½ tsp. jeera

Here is how I made it:


  1. Soak the tamarind in a cup or so of warm water and squeeze out the juices.  Discard the remaining pulp.
  2. In a pot, bring the tamarind water, salt, curry leaves, turmeric, and hing to a boil.  Reduce heat to low.
  3. Heat the oil in a small pan and roast the toor dal, coriander seeds, cumin seeds, peppercorns, and red chili for a couple of minutes.
  4. Grind this to a paste with the tomatoes, curry leaves, and garlic (optional).
  5. Add the ground paste to the simmering tamarind water.  Add more water to dilute the rasam.
  6. Bring this whole thing to a boil and turn off the heat (remember not to let this boil for long)
  7. Heat ghee in a small pan. Add mustard and jeera seeds.
  8. When the mustard seeds sputter, turn off the heat and pour this tempering over the rasam.

Serve with rice, paruppu thogayal and urilaikizhangu curry.

Saturday, October 19, 2013

Absolutely simple Aloo/ Urilaikizhangu/Potato curry

I always have potatoes in my house.  Neither my husband nor my sons will complain if I make potatoes.  Potatoes are my husband’s favorite.  If I am at a loss on what to make for dinner, he will immediately say – aloo curry panniden (why don’t you make aloo curry).

There are so many different variations even to the most basic potato recipe.  You can make it with or without onions, add other masalas, maybe add peas, cilanto, curry leaves, or garlic, and the taste changes subtly.  

My husband loves to make this and will offer to do so about once every couple of months.  He cooks well, but doesn’t do it often.  He can make very good sambar, dal, and potato curry.  He has also made rava dosa for a party (when I was away) and apparently got rave reviews.  I am still waiting for him to make it for me :)


Dry Potato Curry

Here is what you need:

(easily serves a family of four)

  • 8 – 10 medium sized potatoes, boiled, peeled, and cubed
  • 2 – 3 tsp. oil
  • ½ tsp. mustard seeds
  • ½ tsp. split urad dal
  • ¼ tsp. turmeric
  • salt to taste
  • 1 – 2 tsp. red chili powder (depending on how spicy you want it)


Here is how I made it:


  1. Heat oil in a saucepan.  Add mustard seeds and urad dal.
  2. When the mustard seeds sputter, add the cubed potatoes, turmeric powder, salt, and chili powder. Mix well.
  3. Cook on low heat, stirring occasionally till the potatoes are crispy on the outside.


Serve with rice and rasam or vatha kuzhambu for a delicious meal.  Can you see the steam rising from the potatoes?


Wednesday, October 16, 2013

Sundal with garbanzo beans


Navrathri and sundal are almost synonymous.  During Navrathri, a lot of South Indians set up Golu or Kolu – a display of dolls, featuring various gods and goddesses.  It is typically displayed on steps.  There has to be an odd number of steps, and you need to have the traditional mara paachi bommais (a pair of special wooden dolls) in your display.

Garbanzo Sundal

Like I mentioned in a previous post, my mom did not keep Golu, but we would be invited to various houses in our neighborhood.  I would wear pattu pavadai (silk skirt) and go from house to house, collecting vethalai-paaku (beetel leaves and areca nuts) and some other girlie goodies (like small combs, really tiny mirrors, or maybe bangles, or bindis).


My Golu this year

In some houses, the mamis (aunties) will ask us to sing.  I think most of them become aware of my singing abilities and didn’t force me to sing the next time I went :)

Along with the goodies, everyone also will give us a packet of sundal.  Each day people make a different type of sundal.  By the time I came back home after making the rounds, I would have a good variety to choose from. Now that I think of it – it is like how my kids go from house to house collecting candy on Halloween!


I also make sundal now during navrathri.  If I have people coming to visit my golu, I make a lot, but if it is just for prasadam for that day, I soak very little beans in a small katori (cup) and make that by boiling it with salt and then adding a simple seasoning of mustard seed, hing, red chilies, and curry leaves.

I made this sundal for a party I had last weekend.   I used garbanzo beans, but you can substitute yellow peas, dried green peas, kala channa, lima beans, or mochai (val), and follow the same recipe.

I don't add coconut to the sundal.  This way, I can use any left over channa in some other recipe.


Here is what you need:


  • 1 cup garbanzo beans, soaked overnight – or at least for 6 hours
  • salt to taste
  • ¼ tsp. turmeric
  • 2 tbsp. coriander seeds
  • 2 tbsp. channa dal
  • 3 red chilies
  • 2 tsp. oil
  • ½ tsp. mustard seeds
  • ½ tsp. cumin seeds
  • 2 red chilies
  • few curry leaves
  • ¼ tsp. hing (asafetida)


Here is how I made it:

  1. Drain the water from the soaked beans.  Add fresh water, salt and turmeric.  Cook in a pressure cooker for about 10 minutes on low after the first whistle.
  2. Dry roast the coriander seeds, channa dal, and 3 red chilies till the channa dal changes color slightly. Grind this into a coarse powder. Set aside.
  3. Heat oil in a saucepan.
  4. Add mustard seeds, cumin seeds, and 2 red chilies.
  5. When the mustard seeds sputter, add curry leaves and hing.
  6. Drain all the water from the cooked garbanzo beans and add that to the pan. Sauté for a couple of minutes.
  7. Add the powdered spices.  Mix well.

Serve as a snack or as part of a meal.

Monday, October 14, 2013

No-hassle Ras Malai


I am not a “sweet” person.  You can take that statement any way you want to.  I just don’t like sweets that much.  I can go for months without having sweets and not miss it one bit! 


Ras Malai

Most people I know have a weakness for sweets.  So when I have parties, I need to make something for dessert.  My repertoire is quite limited.  I can make kalakand, rava kesari, jamuns (this is my friend Soni’s specialty, but I can make a passable jamun), kheer, carrot halwa, and this ras malai. 


This is really not a recipe.  It is wonderful way to put store-bought ingredients together for a great  dessert :)  It tastes a lot better than the ras malai you get in the store (both canned and refrigerated varieties).

My friend Harini, introduced me to this shortcut.  She learned this from her sister.  I use it regularly when I have people over.  This recipe is so easy and only has four ingredients.  It uses store-bought rosogullas.  I used to boil and reduce the milk down to make the ras, but learned the other shortcut from another friend – evaporated milk! 

Here is what you need:

  • 2 cans of rosogullas (I use Haldirams – each can has 14)
  • 2 cans evaporated milk
  • 1 can condensed milk
  • few chopped pistachios

Here is how I made it - or rather - put it together:

  1. Drain all the syrup from the rosogullas. 
  2. Take each rosogulla in the palm of your hand and squeeze out as much of the syrup as you can.  Place these in a serving dish.
  3. In a sauce pan, combine the evaporated milk and the condensed milk.  Bring this to a boil.  Turn off the heat.
  4. Pour the milk mixture over the rosogullas.
  5. Top with chopped pistachios.

Serve chilled.


Wednesday, October 9, 2013

Samosas with dumpling wrappers


My friend Soni makes the best samosas. She makes everything from scratch – including the flaky, crispy crust.  I don’t think I can ever match that – and so don’t attempt to.  I have tasted samosas at restaurants here and in India, but nothing comes close to hers.

Samosas with dumpling wrappers

Soni was our neighbor for the longest time.  She lived two doors away, and would send delicious goodies our way frequently.  She has now moved to a different neighborhood. I really do envy her neighbors.

I have tried various short-cuts for the crust.  This is my most recent attempt and I think they came out well.  I used dumpling wrappers that I had bought for something else and filled them up with the spicy potato mixture.  Since I was making this for a Navrathri party, I made sure that the dumpling wrappers did not have eggs in them.  I also omitted the onions.  They turned out great - not anywhere close to Soni’s, but for a quick samosa recipe, they were good.


Pot Sticker mold


I had a mold for making pot stickers.  This helped making the samosas a snap!  I could easily make about 60 in an hour.

Here is what you need:

(makes about 30 – 40)

  • 2 tsp. oil
  • 1 tsp jeera (cumin seeds)
  • ¼ tsp ajwain (carom seeds)
  • 4 green chilies, minced
  • 2” piece ginger, minced
  • 10 medium sized potatoes, boiled, peeled, and diced into small pieces
  • salt to taste
  • ¼ tsp. turmeric powder
  • 1 tsp. chili powder
  • 1 tsp. jeera powder
  • 1 tsp. coriander powder
  • 1 tsp. amchur (dried mango) powder
  • chopped cilantro
  • dumpling wrappers
  • water to brush
  • oil for deep-frying

Here is how I made it:


  1. Heat oil in a pan. Add jeera and ajwain.
  2. When the jeera turns slightly dark, add the green chilies and ginger.  Sauté for a couple of minutes.
  3. Now add the potatoes, salt, turmeric powder, chili powder, jeera powder, coriander powder, and amchur powder.
  4. Sauté for a few more minutes till all the spices are blended.  Turn off the heat.
  5. Add the cilantro and mix well.  Set aside.
  6. Heat oil for deep-frying.
  7. Take dumpling wrappers on at time and place on the mold. Wet the whole wrapper with water.
  8. Place a little more than a spoonful of filling in the center and close the mold, pressing it hard, so that the edges are sealed.  (If you don’t have a mold, you can place the wrapper in the palm of your hand and press with your fingers to seal the edges.)
  9. When you have five or six ready, drop them in the hot oil and fry over medium heat till the crust is golden brown and crispy.
  10. Repeat till all the filling is done.


Serve hot with cilantro/pudina chutney.

These came out so well that I am making them again for a party on Friday!


Sunday, October 6, 2013

Vegetables with Panch Phoron (Panch Phoron Chorchori)


Last week, I had one of those days – I did not feel like cooking anything.  It happens once in a while.  I was getting bored with all the regular stuff that I normally make and also did not feel like getting food from outside.

I kept opening my fridge to see what I had – and for inspiration to strike.  I had a little bit of cauliflower, some carrots, one capsicum, couple of white eggplants from my garden, and a handful of beans, also from my garden – not exactly inspiring stuff.

Vegetables with Panch Phoron

I then realized, I had all the ingredients to make Panch Phoron Chorchori – the recipe that introduced me to the Bengali five-spice blend! (See my post on Dal with Panch Phoron, for more information.) I hadn’t made it in ages, and now seemed like the perfect time.  I also got to use up a lot of the left-over vegetables in my fridge! A delicious dinner was ready in just a few minutes.

Note 1: The original recipe calls for red pumpkin and peas.  I did not have either of those at home.  I think you can add any combination of vegetable you have, and it will work well.

Note 2:  The original recipe also asks you to add sugar, but I don’t.  I have included it in the recipe as an optional ingredient.


Here is what you need (recipe adapted from Festival Cookbook by Vimala Patil and Monisha Bharadwaj):

(easily serves 3 - 4 people)
  • 2 tsp. oil
  • 1½ tsp. panch phoron (fenugreek seed, onion or nigella seed, cumin seed, black mustard seed and fennel seed in equal parts)
  • 1 bay leaf
  • 2 red chilies
  • 2 green chilies, split lengthwise
  • ¼ tsp. turmeric powder
  • 2 medium sized potatoes, cubed
  • 10 - 12 cauliflower florets
  • 1 capsicum, seeded and diced
  • 1 carrot, sliced diagonally into ovals
  • 5 – 6 beans, cut
  • 1 small eggplant, cubed
  • salt to taste
  • ½ tsp. sugar (optional)
  • cilantro for garnish


Here is how I made it:


  1. Heat oil.  Add panch phoron, bay leaf, and red chilies.
  2. When the mustard seeds sputter, add the green chilies and turmeric.
  3. Add the chopped veggies, salt, and sugar (if you are using).
  4. Add a cup or so of water, cover and cook on medium-low heat till the veggies are cooked.
  5. Garnish with cilantro.
Serve hot with rotis or luchis (pooris made with all purpose flour).


Thursday, October 3, 2013

Sooji Kuzhi Paniyaram


We had an impromptu get together at my friends’ house couple of weeks ago.  With the unusually incessant rain and gloomy weather, we were all getting cabin fever and were ready to venture out for a bit. 

I hadn’t been grocery shopping in a while and did not have much to work with, for the potluck that night.  I did have a package of rava idli mix.  So decided to make kuzhi paniyaram with it.  I also had some mango kulfi that I was going to take for dessert.


For an impromptu gathering, we had a good crowd. Lots of kids and adults and as always, plenty of food.  I mixed up the batter and took my appe / appam pans (also called aebleskiver pans).  I have two now – a cast iron one I got on Amazon, and a non stick one my mom gave me on my trip to India this time.

So we heated up the pans and started making these.  I couldn’t make them fast enough!  Both kids and adults alike loved them!  It was such a simple thing to make and as far as appetizers go, kind of healthy (read non-fried), that my friends were thinking of buying this pan from Costco!


Since I could not take pictures at the party, I made a few more at home so that I could share some images with you.

Note:  If you have people who don't eat onions, you can substitute grated carrots instead.

Here is what you need:

(makes about 30 - 40)
  • I package MTR Rava Idli Mix (you can make your own too – I will post a recipe soon).
  • enough yogurt to make the batter (I used about 36 oz.)
  • 1 medium sized onion, finely chopped
  • 3 – 4 green chilies, chopped
  • 2” piece ginger, minced
  • generous amount of cilantro, chopped
  • few curry leaves
  • oil or non stick spray

Here is how I made it:


  1. Mix the rava idli mix and the yogurt well. Set aside for 10 minutes
  2. Now check the batter.  If the batter looks too dry and thick, add a little bit of water.  The batter should be thick (like cake batter)
  3. Add the chopped onions, green chilies, curry leaves, cilantro, and ginger.  Mix well
  4. Heat the appe / appam pan.
  5. Add a few drops of oil in each depression (kuzhi)
  6. When the pan is hot, add a tablespoonful of batter into each depression. The batter should fill about ¾ of the way.
  7. Cover and cook for about 5 minutes.
  8. With a butter knife or skewer, flip the balls over.
  9. Cook uncovered for 5 more minutes, till both sides are crispy.
  10. Remove the paniyarams from the pan.
  11. Repeat until all the batter is done.


Serve hot with spicy chutney.


Related Posts Plugin for WordPress, Blogger...