Pages

Wednesday, April 30, 2014

Barley and Oats Adai

I recently came across this recipe for making adais with oats and barley.  The recipe was really simple and I had all the ingredients on hand.  Since I had just made adais recently, I bookmarked the page and decided to make this the next time I made adais.

One day last week, I soaked all the ingredients before going to work, so that I could make the batter in the evening when I got home.  Usually, by the time my husband gets home, there will be some signs of cooking and he will get a sense of what is in store for dinner.  Because I had already made the batter and had made the chutney, there were no signs of any prep work happening for dinner.


The conversation went something like this:
Him: “What’s for dinner?”
Me: “Well, I've made the batter for adai - Oats and barley adai.”
Him: “Vara vara ne enakku kuthirai sapadu than podare” (now a days you are only giving me horse feed for dinner!)

Once the adais were made though, he loved them. He thought they were so good that a couple of days later, he made himself a few with the left over batter!  He said they were really easy to make and tasted great. 


The recipe is almost exactly from here.  I did not have spinach, and so substituted amaranth leaves instead. I also increased the amount of dals I used.

I have reproduced the recipe here for easy reference.

Here is what you need (recipe source – Veg Inspirations):


  • 1 cup brown rice 
  • 1 cup rolled oats
  • ½ cup pearl barley
  • ½ cup masoor dal) 
  • ½ cup moong dal
  • ½ cup toor dal
  • 3 – 4 green chilies
  • 4 dried red chilies
  • salt to taste
  • ¼ tsp. hing (asafetida)
  • 1 cup amaranth leaves, chopped 
  • oil for making the adais


Here is how I made it:

  1. Mix the rice, oats, barley, and the lentils in a bowl.  Rinse these a couple of times, add water and let it soak for 3 – 4 hours.
  2. Drain the water from the mixture and grind this to a coarse paste with the green chilies, red chilies, salt, hing, and greens, adding little bit of water.  You may have to grind these in batches, depending on your blender capacity
  3. Heat a tawa or a griddle.  I like using my cast iron griddle for adais.
  4. Pour a ladle full of batter onto the heated tawa and spread it out.  It should be slightly thicker than dosas.
  5. Make a small hole in the middle and drizzle oil around the adai as well as in the center. 
  6. Wait for a few minutes – maybe about 3 - 4 minutes and then carefully flip it over.
  7. Cook on both sides till the adai is crispy.


Sever hot off the tawa with chutney of your choice.


Thursday, April 24, 2014

Andhra Pulihora

This year, Tamil New Year’s Day came on a Monday.  On weekdays, I only cook at dinnertime.  I don’t have time in the mornings and since no one takes elaborate meals for lunch, it seems like a better idea to cook fresh food when everyone is ready to eat.  Anyway, I figured that there was no way I could come back after work and make an elaborate meal. So we decided to celebrate Tamil New Year’s Day one day early – on Sunday.

In Chennai, people typically make vepamboo (neem flower) rasam, mangai pacchidi with neem flower, some sambar, vegetable, kootu, payasam or some other sweet, and vadai.  Since I have no access to neem flower, and no consistent access to mangoes, I made ulundu vadai, Andhra style tamarind rice, lemon rasam, avial, vazhaikkai curry,  and rava kesari.

 
Andhra style tamarind rice


I know – it being Tamil New Year's Day and all, I should have made Tamilnadu-style puliodhare, but have been meaning to try my friend Anu’s mom’s pulihora recipe for a while now.  And this seemed like a good occasion.  It tasted so good when she made it for us.  We had this for lunch, snack, and dinner for two days in a row! 

The recipe asks for freshly powdered mustard seeds.  The day she made it for us, Anu had no mustard seeds left at home.  Her mom said - might as well not serve this now - or some thing to that effect - meaning that the dish is not complete without powdered mustard seeds.  We had to make a quick trip to the Indian store to get her the mustard seeds so that we could enjoy the pulihora.  These add so much flavor to the dish that my husband wanted to know if I used mustard oil to make it!


Here is what you need:

(with this quantity, I was able to make mix two cups of rice and have a little bit of the paste left over)

  • 2 cups basmati rice, cooked and cooled
  • ¼ cup tamarind
  • 3 Tbsp. sesame oil
  • 4 red chilies, crushed
  • 2 tsp. mustard seeds
  • 2 tsp. channa dal
  • ½ tsp. hing (asafetida)
  • ¼ cup peanuts
  • few curry leaves
  • ¼ tsp. turmeric powder
  • 3 Tbsp. mustard seeds


Here is how I made it:


  1. Soak the tamarind in about 2 cups of warm water and extract the juice.
  2. Heat oil. Add mustard seeds, channa dal, red chilies, and hing.
  3. When the mustard seeds sputter, add the curry leaves and peanuts.  Fry for a minute.
  4. Gently add the tamarind juice, turmeric powder, and some salt to taste.
  5. Bring this to a boil, reduce heat to a medium-low and cook for about 10 – 15 minutes till this whole thing becomes a slightly thick. Turn off the heat.  You can save this paste in the fridge and mix it with rice when you need it.
  6. While this is cooking, powder the mustard seeds in a spice grinder.  Set aside.
  7. Add the paste a little at a time to the rice and mix well.   When it tastes like it has enough flavor, add the powdered mustard a little at a time.  This has a very strong flavor, so keep tasting as you add this.  I probably used about half of the powdered mustard.
 

If you are making this for a party, make it ahead of time.  It tastes much better when the rice has had a chance to absorb all the flavors.  

With this quantity of paste, you can make about 2 – 3 cups of rice.


Friday, April 18, 2014

Brown Rice (with Basmati Rice) –my mom’s specialty

My one year anniversary and my 100th post!

I am so lucky to still have in my life, the friends I grew up with.  Not only are we in touch, we are a huge part of each others' lives.

We used to spend a lot of our vacation time in each others' houses, just “hanging out”, being silly, getting emotional, providing each other with a shoulder to cry on, feeling righteous, getting riled up against our common enemies (there were quite a few), talking, eating, more talking - about mean teachers, boys, clothes, things of consequence, things of no consequence, movies, music, parents, siblings – you name it, we talked about it - and still do.  Nothing was off limits, and you could say whatever came to your mind – no censoring or sugar-coating necessary.


Birthdays were also spent together.  For my birthday, which always came during summer vacation, everyone would come to my house.  The girls would bring me presents – something small and sentimental, with sentimental cards to go with them.  Anu would have written something way better than any professional card writer could write, and all of us would get emotional.

My mom would cook an elaborate meal, which almost always included brown rice, because, that was her most requested dish, and my friends loved it.  My mom is a great cook and makes a lot of things well, but even today, this is what my friends talk about, when we reminisce about the good old days - this brown rice and my mom’s adais.


I never thought to get this recipe from my mom, and by the time I got around to asking her, she had forgotten exactly how she made it.  She told me what she remembered, but it never turned out to be exactly the same.  I have been making minor adjustments to what she told me and this is as close to the original as I can get.

Girls, this one is for you.

Here is what you need:


  • 1 cup basmati rice
  • 1 tsp. ghee
  • 2 tsp. oil
  • 1 tsp. cumin seeds
  • 1 bay leaf
  • 4 -5 cloves
  • 1 star anise
  • ½  medium onion, slivered
  • 1 tsp. garlic , minced
  • 1 tsp. ginger, grated
  • ½ tsp. sugar
  •  ½ cup frozen or fresh green peas (I use the one from the Indian store)
  • salt to taste
  • browned onions for garnish (optional)


Here is how I made it:


  1. Wash and soak the basmati rice in enough water for about 20 minutes.  Drain and set aside.
  2. Heat ghee and oil in a pot.  Add cumin, cloves, bay leaf, and star anise.
  3. When the spices get slightly browned, add the onions.
  4. Fry on medium heat till the onions get richly browned, but not burnt.  I usually save some of this for garnish later, but you don’t have to.
  5. Add the sugar and mix well.  Keep stirring so that the sugar melts and starts caramelizing.
  6. Add the ginger and garlic.  Mix well.
  7. After a couple of minutes, add the drained rice. 
  8. Fry on medium heat till the rice gets slightly browned.
  9. Now add 2 cups of water and bring this to a boil.
  10. Add peas and salt.  Stir well.
  11. Cover and cook on low for about 10 minutes, till the rice is done.
  12. Turn off the heat and let this sit for 10 more minutes.  Fluff it up with a fork to separate the grains.
  13. Top with browned onions (if you are using them).


Serve with vegetable kurma, egg curry or raitha.


Saturday, April 12, 2014

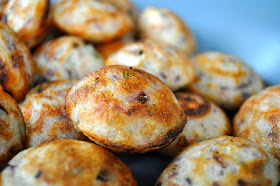
Kuzhi Paniyaram with left over idli batter

I posted a recipe for sooji kuzhipaniyarams a while ago.  This was such a big hit, in my house, as well as with my friends.  These are so simple to make and use very little oil compared to the traditional deep fried appetizers, that people loved them.

Once I posted the recipe for this on my blog, my friend, Shabana, told me that she had seen these at Grand Sweets and Snacks, but that their version uses a ton of oil.  She couldn’t believe how simple and healthy, these were to make and wanted to try them out – so I sent her a pan.


She has made these several times since then.  Once, when I spoke to her, she told me that instead of sooji, she made it with left over idli batter, and those came out well too.  I had to tell her though that this is how people make it normally – with left over idli batter.  The sooji is the variation! She was mighty thrilled to have stumbled upon the original version, without realizing that this was the original version :)

Since, after making my uthappams, I still had some batter left over, I decided to make these last weekend for breakfast.


Here is what you need:

(adjust quantities based on the amount of batter you have left)

  • 2 cups left over idli/dosa batter
  • 2 tsp. oil
  • 1 tsp. mustard seeds
  • 2 tsp. channa dal
  • ¼ tsp. hing
  • 2 – 3 green chilies, chopped
  • few curry leaves
  • ½ medium onion, diced fine
  • 1 carrot, grated
  • chopped cilantro
  • little bit of salt (remember the idli batter already has salt in it)
  • oil for making the kuzhi paniyarams


Here is how I made it:


  1. Heat oil in a small pan.  Add mustard seeds, channa dal, and hing.
  2. When the mustard seeds sputter, turn off the heat and pour this into the idli/dosa batter.  Mix well.
  3. Mix in the green chilies, curry leaves, onions, carrots, cilantro and salt.
  4. Heat the appam pan (also called aebleskiver pans).
  5. Add a few drops of oil in each hole (kuzhi)
  6. When the pan is hot, add a tablespoonful of batter into each hole. The batter should fill about ¾ of each hole.
  7. Cover and cook for about 5 minutes.
  8. With a butter knife or skewer, flip the balls over.
  9. Cook uncovered for 5 more minutes, till both sides are crispy.
  10. Remove the paniyarams from the pan.
  11. Repeat until all the batter is done.


Serve hot with spicy chutney.


Wednesday, April 9, 2014

Utthappam with left-over idli batter

I make idli/dosa batter every other week.  And I use the same batter to make idlis and dosas. 

The last time I made the batter, I substituted 1 cup of brown rice for 1 cup of regular rice.  The idlis were unbelievably soft!  I usually am lucky and get soft idlis consistently, but these were the softest idlis ever!  I will post the exact measurements soon.

Anyway, the only downside to this was that the dosas I made with this batter were soft too.  My family loves crispy dosas.  I couldn’t use this batter to make dosas.  And there were only so many days I could make idlis for dinner.  So I ended up making utthappams first and then kuzhi paniyarams later with the left over batter.


Utthappams were not a favorite, when I was growing up.  It was a way for my mom to get rid of really sour dosa batter.  It wasn’t something anyone ever asked her to make, and most of the time, my mom and grandma would be the only ones eating it.

Now though, I make uttappams regularly.  The batter does not get very sour ever in Colorado.  So even though there is no need for me to make these, I do, because I have come to appreciate the taste and my husband loves them too.


Here is what you need:

(adjust quantities based on the amount of batter you have left)

  • 2 cups left over idli/dosa batter
  • 2 tsp. oil
  • 1 tsp. mustard seeds
  • 2 tsp. channa dal
  • ¼ tsp. hing (asafoetida)
  • 2 green chilies, chopped (the ones I had at home were really hot, so I only needed two)
  • few curry leaves
  • ½ medium onion, diced fine
  • 1 carrot, grated
  • little bit of salt (remember the idli batter already has salt in it)
  • dosai milagai podi (also called gun powder) for sprinkling on top
  • oil for making the utthappams


 Here is how I made it:

  1. Heat oil in a small pan.  Add mustard seeds, channa dal, and hing.
  2. When the mustard seeds sputter, turn off the heat and pour this into the idli/dosa batter.  Mix well.
  3. Heat a griddle or tawa.
  4. Pour a ladle full of batter on the griddle and spread to make a thick dosa/pancake.  This needs to be thicker than the regular dosa/crepe, but not too thick. (see picture)
  5. Sprinkle a little bit of the chopped onions, green chilies, curry leaves, and carrots on top.
  6. Drizzle oil on the outside.
  7. When the edges get slightly browned, flip it over and cook on the other side.
  8. After a couple of minutes, flip it back.  Sprinkle some milagai podi/gun powder on top.
  9. Flip this over again for 30 seconds.  Remove from heat.
  10. Repeat till all the batter is done.


Sever hot with chutney or sambar.  Since this already has the chili powder, you can also eat it just like that.

Saturday, April 5, 2014

Vallarai Thogayal (Pennywort / Brahmi Chutney)

My mom has visited us a few times in the last few years.   She has almost always come here when the kids are in school and the weather is cold.  Due to various scheduling issues and commitments, she has not been able to spend summer with us.  The last time she came, it was in August.  The weather was wonderful – late summer, fall temperatures.  School still had not started for either the kids, or me, and we could actually spend some time together.

After school started, she would get bored sitting at home, alone, through the day.  We got Sun TV and some other channels, but there is only so much TV one can watch.  She loves to read. We would go to the library every week and get tons of books.  If the weather is good, she would go for a walk.  She also talked to her friend in Houston everyday, exchanging kitchen stories and recipes, especially the ones that came on cooking shows.


Brahmi / Pennywort Chutney

I always take her grocery shopping because it was one way for her to get out of the house and she loves looking at the massive produce we have here (some of them look great, but don’t taste as good as what we get in India).

Our local Asian market is one source for Indian vegetables.  They also have a variety of greens in stock.  I have been buying pennywort (vallarai/brahmi) from there frequently.  I usually make it like I would any other saag (greens). My mom got really excited when she saw this – because she said – it improves memory and is really good for kids’ studies.  She also said that even in Chennai, she doesn’t see this keerai often.

We bought the keerai and she made chutney with it.  This is my first attempt at making this.


Here is the recipe:


  • about ½ lb. vallarai (pennywort / brahmi)
  • 2 tsp. oil
  • 2 – 3 red chilies
  • ¼ tsp. hing
  • ¼ cup urad dal
  • small ball tamarind (about the size of a grape/cherry tomato) or 1 tsp. tamarind pulp
  • ¼ cup grated coconut
  • salt to taste


Here is how I made it:


  1. Remove and discard the stems.  Wash the leaves thoroughly and let it sit immersed in a bowl of water for about ½ hour, till all the sand and debris settle to the bottom.  Remove the leaves and rinse again.
  2. Heat oil in a pan.  Add the red chilies, hing, and urad dal.  Fry till the urad dal and chilies change color.
  3. Add the leaves and fry till they are wilted.  Turn off the heat and let this cool.
  4. Grind the leaves with salt, tamarind and coconut to a smooth paste.

Serve with idlis, dosas, uttappams, or rice.


Wednesday, April 2, 2014

Instant Mango Pickle

It is the beginning of April, just about warming up here.   Starting to feel like spring - wonderful 60 degree temperatures, with the occasional snow.   Spring weather can be really erratic in Colorado.  We sometimes have 70 degree temperatures in the morning followed by snowfall at night.

This is such a contrast to April and May in Chennai.  My memories include finishing up final exams, battling the heat during power cuts, water shortage, agni nakshatram (the hottest 30 days in summer),  kids playing cricket in the 100 degree sun, nights spent sleeping on the mottai maadi (terrace), hanging out in my friends’ houses, my birthday, and mangoes.


I don’t miss the heat or the power cuts, but one of the things I do miss about summer in Chennai – mangoes.  Everywhere you look, there will be mangoes – banganapalli, alphonso, and malgova to name a few.  There will also be kili mooku manga (parrot-beak mango - pictured here).  These are the green, tart mangoes, usually sold by vendors on the beach.  People also make instant pickle with it – especially on festive occasions.   

I went to my Indian store yesterday and saw that they had a different variety of green mangoes.  Just looking at them took me back to my school days.  I can remember this vendor on the beach, artfully displaying cut mangoes - serving them with chili powder and salt.  I immediately bought some and made this pickle.


Here is what you need:


  • 1 green mango (needs to be tart)
  • 1 tsp. mustard seeds
  • ¼ tsp. methi seeds
  • salt to taste
  • 2 tsp. red chili powder
  • ¼ tsp. hing
  • 2 tsp. oil
  • 1 tsp. mustard seeds

Here is how I made it:


  1. Peel and dice the mango.  Add salt.  Set aside
  2. Dry roast the mustard seeds and methi.  Cool and powder.
  3. Heat oil.  Add mustard seeds for tempering.
  4. When mustard seeds sputter, turn off the heat and add red chili powder, hing, and the powdered mix.
  5. Pour this over the diced mangoes.  Mix well.

That’s it!

You can store this in the refrigerator for a few days.  Goes great with yogurt rice.  I eat it just like that!